The primary responsibility of an administrator is to successfully execute the onboarding process. Key tasks involved in onboarding include:
Adding the organization : Adding the details of the organization.
Configuring settings: Tailoring the system to meet the organization’s specific needs by creating custom fields, setting up ERP, adding bookkeeping accounts and adding the merchant category codes .
Creating rules: Establishing rule configuration settings for expenses.
Adding users: Onboarding users to access the portal based on their role, request cards, block cards etc.
Top-up accounts : Ensuring cardholders have sufficient amount in their accounts to carry out transactions.
Dashboard
1. Dashboard
Admins can quickly access essential information across various categories such as transactions, admins, UBOs, rules and spend analysis through charts and graphs. .
2. Quick Access
For quick access of specific pages or sections one can click on the numbers displayed on the respective widgets.
3. Organization List
Admins can customize the dashboard information based on organizational levels.
4.Month/Year Setting
The month/year setting enables viewing specific details according to the applied settings.
Easi Guide Chatbot
1. EASI Guide Chatbot
Assists users in understanding features, navigating through processes, and providing help and support.
Organization
1. Organization
The Organization module allows users to view organization details, add and edit organizational information, and manage associated datasets.
Admins can navigate different organizational levels using an organization tree structure. This layout displays various levels of the organization, which can be collapsed or expanded. It also includes a search feature for finding specific organizations by name.
Admins can click on cards to quickly navigate and manage Transactions, Users, Admins & UBOs, Accounts, Payments, and Settings.
3.Organization Details
Basic organization details are displayed here, including their status and an option to change it.
4.More Details
Additional details of the organization are available in the default collapsed state. An admin can expand the section to view them.
6.Add Child Org
Admins can click on the button to open the Add Organization modal window and add details of the new child org.
7.Organization Tag
To help in identifying the organization for which the information is being displayed.
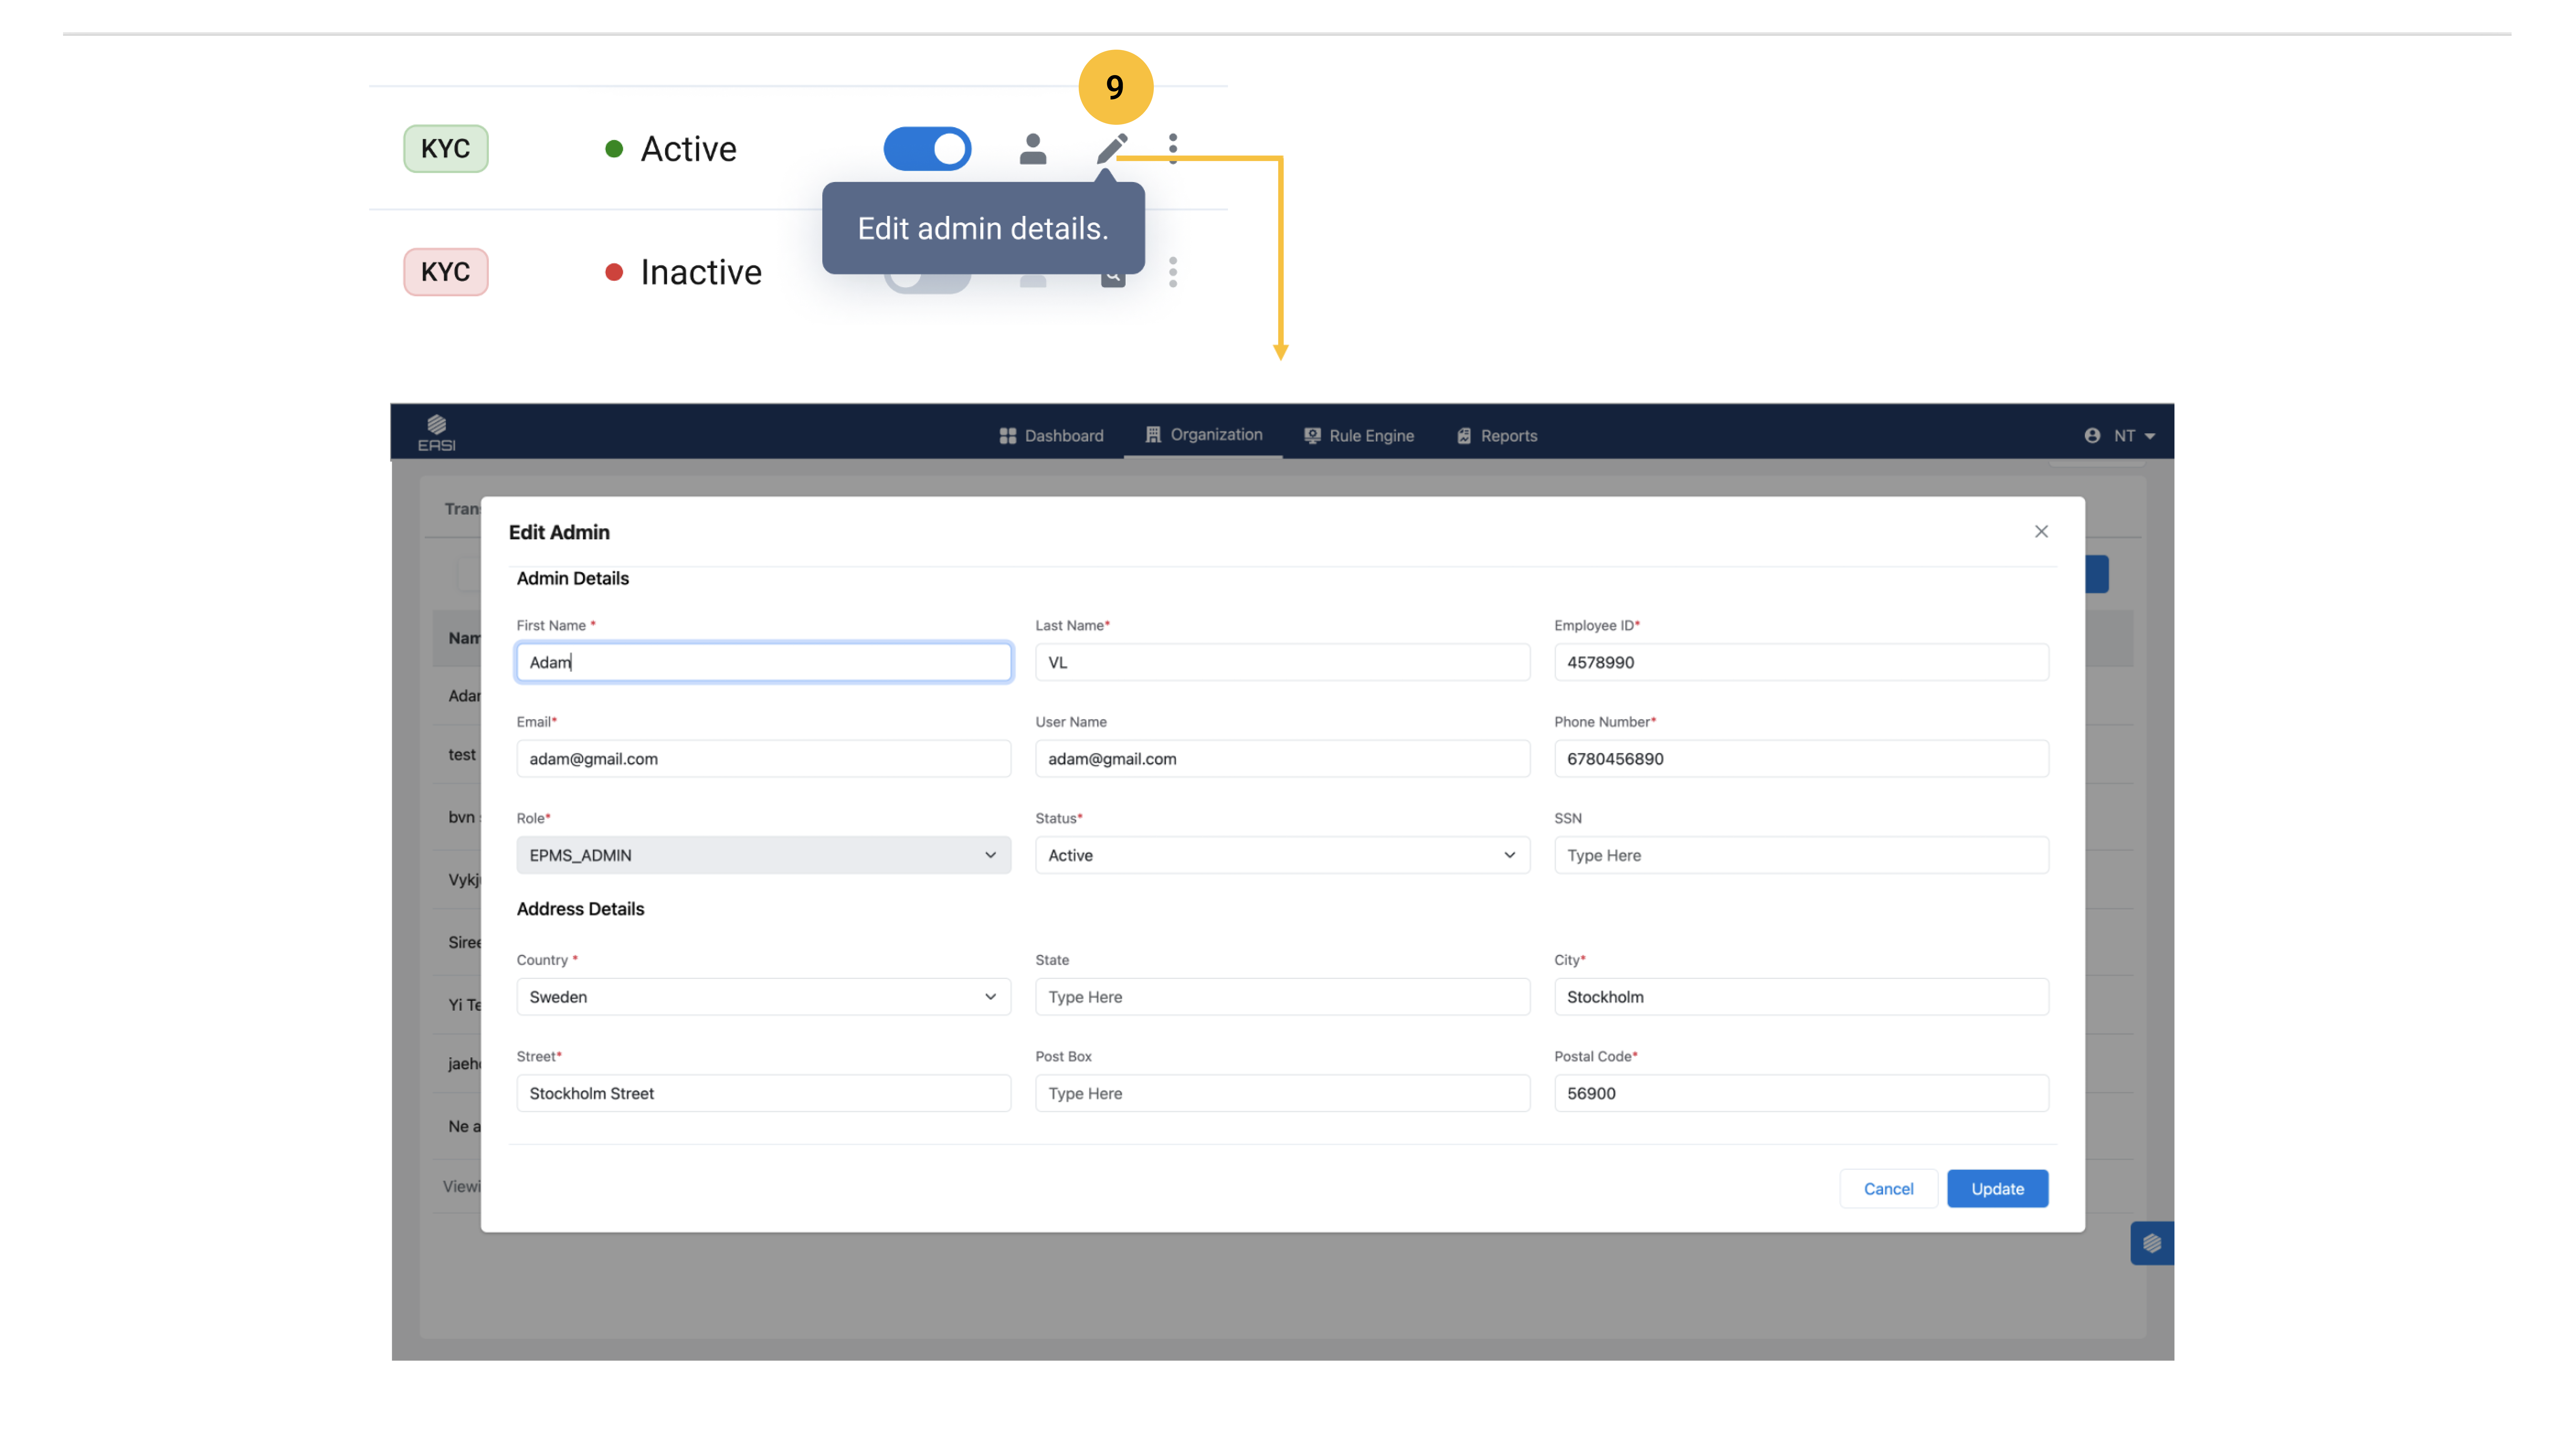
8.Edit
Admins can click on the button to open the Edit Organization modal window and modify details.
9.Activate / Deactivate Org.
Admins can activate or deactivate an organization using the toggle button. Confirmation of their action will be requested before finalizing it.
<span data-metadata=""><span data-buffer="">10. Steps To Add Organization:
1. Open the “Add Organization” modal window by clicking the Add Child Org. button.
2. Enter the mandatory details related to the Organization and address segment correctly along with Admin details.
3. Click “Confirm” to add the organization.
Note:
•You can cancel the process if necessary. A confirmation will be required for your action upon clicking Cancel. •The new organization can be accessed from the organization tree structure on the landing page.
<span data-metadata=""><span data-buffer="">11. Steps to Edit Organization
1. Open the “Edit Organization” modal window by clicking the “Edit” button.
2. Review the details related to the organization and address segment.
3. Make the necessary edits.
4. Click “Update” to confirm the changes made to the organization details.
Note: •You can cancel the process if necessary. A confirmation will be required for your action upon clicking cancel.
The Settings page in the Expense Management Admin Portal is a crucial component that allows administrators to configure and customize various aspects of the portal to suit their organization’s needs.The green check marks indicates active settings
Key Categories of the Settings Page •Custom Fields •ERP Configurations •Accounts •MCC
Custom fields enable administrators to create additional fields related to transaction details, which can then be displayed within the application and portal
<span data-metadata=""><span data-buffer="">2.Field Visibility in EMOB
Admins can enable / disable the fields in the cardholder mobile application
<span data-metadata=""><span data-buffer="">3.Field Inputs for ERP<span data-metadata="">
To enable / disable transfer of field inputs to ERP.
<span data-metadata=""><span data-buffer="">4. List Filter
Admins can view the field list as per active and inactive status.
Field details can be viewed in the grid itself by expanding the field information, similar to an accordion.
6. To activate/deactivate the custom fields in application & portal
7. To edit fields
8.Steps to Add New Field
i. Open the “Settings” page within the “Organization”module. ii. Select the “Custom Fields” settings iii. Click the “Add New Field” button to open the “Add Field Details” modal window. iv. Provide the required details to create the new field. v. Click the “Add Field” button to complete the task.
9.Steps to Edit Field Details
i.Open the “Settings” page within the “Organization” module. ii.Select the “Custom Fields” settings iii.Click the “Edit Field Fields” icon under “Actions” to open the “Edit Field Details” modal window for the chosen field. iv.Make the required details to create the new field. v.Click the “Update” button to complete the task.
ERP Configuration settings help admin to set up the ERP for booking of transaction details. Without setting up an ERP, the booking of transactions won’t happen.
2. ERP Details
The ERP details are displayed here once they are added. It is crucial to add ERP details for some ERPs to complete the set up as without proper ERP setup, booking transactions will not be possible.
i. Choose the alternative ERP from the available options. ii. Click the “Change ERP” button and confirm the ERP change. iii. Enter the required ERP details to complete the new ERP setup.
Accounts
1. Accounts settings allow admins to view and add bookkeeping accounts related to different transaction categories.
To add accounts, the admins can use the accounts list template in .csv or .xlsx format to avoid errors.
<span data-metadata=""><span data-buffer="">5. Add New Account<span data-metadata="">
i.Navigate to the “Settings” page within the “Organization” module. ii.Select “Accounts” settings. iii.Click on “Add New Account” to open the modal window for adding accounts. iv.Choose default option “Add by File Upload” or Choose for “Add by Manual Input”
*Add by “File Upload” steps : i.Upload the list of accounts in the compatible template & format provided in the portal. ii.Click on Confirm to complete the process of adding accounts.
6.Add by “Manual Input” steps :
“>i. Enter Account numbers and Account Descriptions which are mandatory for adding complete details. ii.Click on Confirm to complete the process of adding accounts
<span data-metadata=""><span data-buffer="">MCCs
1. MCC settings enable admins to view MCCs by category and submit requests for updating the list with new MCCs.
The MCC list can be sorted by default (numbering) or by recent/old updates.
3. Information about total merchant categories and MCCs
<span data-metadata=""><span data-buffer="">4. MCC List Categories<span data-metadata="">
The MCC list are displayed as per the merchant categories.
5.Filter by Alphabetic Grouping
The MCC list can be filtered by alphabetical grouping of their descriptions.
6.Request MCC Update
i.Navigate to the “Settings” page within the “Organization” module.
ii.Select “MCC” settings.
iii.Click on “Request MCC Update” to open the modal window for adding MCC range and details.
iv.Enter range as per the instruction given and provide “MCC” and “MCC Descriptions” which are mandatory for requesting updates. v.Click on “Send” to request for MCC list update.
Recurring transactions would help to make transactions automatic and avoid repetitive task flows for the CH and admin
<span data-metadata="">2. Add Criteria Set
i. Click on “Add Criteria Set” button to open the modal window.
ii. On selection of a Merchant the MCC and MID will be auto populated. Enter Amount, adjustment percentage and tax percentage manually. Multiple entries can be done in a similar way.
iii. Click on the “Confirm” button to complete it.
3. A criteria set is added in grid with action items such as “Deactivate”, “View history” and “Delete”.
4. Clicking on : View History
Rec. txn history grid will be visible where user can check the history
5. Manage Cardholder Requests:
All recurring transaction requests from cardholders are displayed for review. The action buttons on the right will change according to the status selected.
This module in the admin portal allows viewing and setting rules for transactions across different organizational levels and their cardholders. Rules can be configured either at the individual level or organizational level.
2. Rule View By Organization Structure
Admins can view various organizational levels and select a specific level to see related rule details and features.
3.View By Rule Type
In the rule engine, the cardholder list can be filtered by rule type, such as Organizational Rules or Individual Rules..
The rule configurations and their values provide an overview of the complete rule set implemented to manage cardholder transactions.
<span data-metadata=""><span data-buffer="">Major tasks to be performed by Admin<span data-metadata="">
<span data-metadata=""><span data-buffer="">8.Create New Rule<span data-metadata="">
i.Navigate to “Rule Engine.” ii.Open “Rule Configuration Settings” by clicking on “Create Rule” button. iii.Provide the required inputs for the rule configuration categories. iv.View the “Rule Configuration Summary”. v.Confirm the creation of the new rule.
i.View the Organization rule details. ii.Open “Rule Configuration Settings” to edit the rules. iii.Update the rule configuration with new inputs for the available categories. iv.Review the “Rule Configuration Summary.” v.Confirm the rule “Update.”
i.View the list of cardholders with existing rules. ii.Open “Rule Configuration Settings” to edit rules. iii.Update rule configurations with new inputs for the editable settings. iv.Review the “Rule Configuration Summary.” v.Confirm the individual rule.
Note: Only the rule configuration categories with values or inputs from the Organization rule settings page will be available for editing in the Cardholder rule settings.
Note:
•Create Rule button will be available only once for creating parent organization rule. •Rules can be edited and updated at any time for organizations or cardholders. •Rules created for a parent organization are inherited by its cardholders. These inherited rules can be edited to create individual rules for cardholders. •Child organizations inherit Purchase Limit rule from parent organization. •Updating a parent organization rule won’t impact child organizations’ rules and individual rules of cardholders.
Users can access this page by clicking Edit Details under Action.
<span data-metadata=""><span data-buffer="">
10.For Organization<span data-metadata="">
Rule configurations with valid inputs or values will be highlighted in green with a checkmark indicating their presence.
<span data-metadata=""><span data-buffer="">11. For Cardholder<span data-metadata="">
The rule configurations mirror the organization settings and are highlighted in green with a checkmark to indicate valid inputs or values. The toggle for inheriting organization rule settings will be switched on. Only the rule configuration categories with values or inputs from the Organization rule settings page will be available for editing in the Cardholder rule settings.
<span data-metadata=""><span data-buffer="">12. For Cardholder Individual Rule<span data-metadata="">
The rule configurations differ from the organization settings and are highlighted in purple. The toggle for inheriting organization rule settings will be switched off. Changes in these settings at the organizational level will not affect the individual level.
The Purchase Limit rule setting is mandatory and requires specific inputs to create a rule. This setting limits purchases based on the amount specified per transaction and over a defined period. Valid inputs for the Purchase Limit are essential for creating the rule.
This setting determines which expense categories are permitted. The default setting is Standard Allow, which permits all expense categories regardless of MCC or MID specifications.
Standard Allow *Steps to Set 1st Level Settings i.Select the categories you wish to allow.
The expense categories available for the 2nd level of settings depend on the selections made in the 1st level.
The following configurations can be applied for the 2nd level: •Budget + Duration •Number of Transactions + Budget + Duration •Number of Transactions + Duration
This setting allows expense categories with customized MCC (Merchant Category Code) and MID (Merchant ID Number) specifications. Note: Standard Allow and Custom Allow cannot be applied simultaneously. Setting Custom Allow will override any existing Standard Allow values. Vice versa
19. 1st Level Settings for Custom Allow<span data-metadata="">
Steps
i. Open the “Custom Allow” settings by clicking the “Click Here” link above the list of expense categories.
ii. Review the default MCC (Merchant Category Codes) list provided.
iii. View expense categories along with their MCCs.
iv. Select the required MCCs for the desired expense categories. Selected categories will be highlighted in blue.
v. Proceed to MID (Merchant ID Number) settings for the chosen MCCs.
vi. Enter the required MIDs as needed, or skip to allow all MIDs for the selected MCCs. Categories with inputs will be marked with green check marks.
vii. Click on “Allow” to confirm the custom allow settings.
20.Selected expense categories with MCC and MID specifications are indicated by selected checkboxes.
The available expense categories for the 2nd level of settings depend on the selections made in the 1st level. The following configurations can be applied: •Budget + Duration •Number of Transactions + Duration •Number of Transactions + Budget + Duration
22.Rule Configuration Summary
This summary provides a quick overview of all settings for the available rule configuration categories. It helps admins review and verify any mistakes or missing inputs before creating or updating the rule
The Users page displays a list of all users holding different. Basic details of the users are listed in a grid along with actions items to manage them.
To confirm UBO role assignments of admins, a super admin or an admin in charge of managing other admins can use the UBO role assignment option in the Actions column.
To confirm UBO role removal from admins, a super admin or an admin in charge of managing other admins can use the UBO role removal option in the Actions column.
<span data-metadata=""><span data-buffer="">5.View By Card Status<span data-metadata="">
Admins can view the list of other admins based on their card ownership status.
6.KYC tags<span data-metadata="">
Admins can view the KYC information upon hovering over the tags.
i.KYC Status To open and view the modal window containing the KYC status for the account and card request.
ii.View Rules To open and view the modal window with rule details related to the expense card for the users.
iii.Transactions To go to transaction details pages and view statuses specific to the user, and perform tasks such as submitting, approving, rejecting, reverting, and booking.
iv.Manage Cards To go to the page displaying the list of active and inactive expense cards. Here, you can block cards (temporarily or permanently) and request a new card if all existing cards are permanently blocked.
v.Spend Analytics To open and view the popup containing the doughnut chart showing the spent amount and balance amount for a specific month and year.
It can be accessed by clicking KYC Status in the Actions column menu. Here, admin can view the KYC statuses of cardholder accounts and cards. The options to resend the KYC email and reinitiate KYC are available for applicable statuses.
It can be accessed by clicking Spend Analytics in the Actions column menu. Admin can view the doughnut chart showing the spent amount and balance amount for a specific month and year.
Admins can view the rule details for a user who is a cardholder by clicking the View Rule Details icon in the Actions column. This will open the rule details modal. From the modal window, admins can also navigate to the rule edit page via the provided link.
Admins can access this page from the Manage Cards option in the Actions column of the user list. They can view card status, or can block cards (temporarily or permanently) and request a new card if all existing cards are permanently blocked. Request Card button appears only when all cards are permanently blocked.
Steps to block card i.Click “Block” to open the modal window. ii.Select “Temporary” or “Permanent” block. iii.Provide “Reason” and “Notes” in the modal window. iv.”Confirm” the card block.
Note: If a card is permanently blocked for the reason : “cardholder quitting”, then no automatic replacement card will be generated.
Admins can access the transaction details page specific to a user by selecting Transactions from the Actions column in the user list grid. The transaction view details page and history can also be accessed. They can also perform tasks such as submitting, approving, rejecting, reverting, and booking transactions.
i.Navigate to the “Users” page within the “Organization” module. ii.Click on “Add User” to open the modal window for adding user details. iii.Provide the required details. iv.Click on “Add User” to complete the process. v. View the new user in the list.
<span data-metadata=""><span data-buffer="">17.Edit User Details<span data-metadata="">
i.Navigate to the “Users” page within the “Organization” module. ii.View the “Users” list. iii.Click the “Edit User Details” icon in the “Actions” column for the desired admin to open the modal window. iv.Edit the necessary details. v.Click “Update” to complete the process.
The Admin page displays a list of all admins and those with UBO (Ultimate Beneficial Owner) roles. Super admins or admins handling onboarding tasks can add new admins, edit their details as needed, and assign UBO roles to admins.
To activate or deactivate an admin, use the toggle button in the Actions column.
3. To confirm UBO role assignments of admins, a super admin or an admin in charge of managing other admins can use the “UBO role assignment” option in the “Actions” column.
4. To confirm UBO role removal from admins, a super admin or an admin in charge of managing other admins can use the “UBO role removal” option in the “Actions” column.
i.KYC Status To open and view the modal window containing the KYC status for the account and card request.
ii.View Rules To open and view the modal window with rule details related to the expense card for the admin.
iii.Transactions To go to transaction details pages and view statuses specific to the admin, and perform tasks such as submitting, approving, rejecting, reverting, and booking.
iv.Manage Cards To go to the page displaying the list of active and inactive expense cards. Here, you can block cards (temporarily or permanently) and request a new card if all existing cards are permanently blocked.
v.Spend Analytics To open and view the popup containing the doughnut chart showing the spent amount and balance amount for a specific month and year.
Note : The pages and modal windows are similar to those found in the Users page menu.
<span data-metadata=""><span data-buffer="">6.View By Card Status<span data-metadata="">
Admins can view the list of other admins based on their card ownership status.
i.Navigate to the “Admins & UBOs” page within the “Organization” module. ii.Click on “Add Admin” button to open the modal window for entering admin details. iii.Provide the required details. iv.Click on “Add Admin” button to complete the process. v.View the newly added admin in the list.
i.Navigate to the “Admins & UBOs” page within the “Organization” module. ii.View the “Admin” list. iii.Click the “Edit Admin Details” icon in the “Actions” column for the desired admin to open the modal window. iv.Edit the necessary details. v.Click “Update” to complete the process.
1.The Admin page displays a list of all admins and those with UBO (Ultimate Beneficial Owner) roles. Super admins or admins handling onboarding tasks can add new admins, edit their details as needed, and assign UBO roles to admins.
In the UBO page, activating/deactivating is only available for users with a single UBO role. For admins with a UBO role, this feature is disabled in the UBO page and can be accessed from the Admin/Users page instead.
i.Navigate to the “Admins & UBOs” page within the “Organization” module. ii.Go to “UBO” segment. iii.Click on “Add UBO” to open the modal window for adding UBO details. iv.Provide the required details. v.Click on “Add UBO” to complete the process.
i.Navigate to the “Admins & UBOs” page within the “Organization” module. ii.Go to the “UBO” segment and view the UBO list. iii.Click the “Edit UBO Details” icon in the “Actions” column for the desired UBO to open the modal window. iv.Edit the necessary details. v.Click “Update” to complete the process.
On this page, administrators can view the organization account and cardholder accounts list. They can also perform various actions, including: •Top-up for cardholder accounts and the main organization account •Request payment •Transfer amount Additionally, at the end of each month, any unused amounts from cardholder accounts will be automatically transferred to the organization account.
2.The different statuses of the amount are displayed to help the admin before proceeding with the top-up of cardholder accounts.
<span data-metadata=""><span data-buffer="">3.Individual Top Up For Accounts<span data-metadata="">
i.Open the “Accounts” page within the “Organization” module. ii.View the list of cardholder accounts under the “Individual Top Up” tab. iii.Check the status of the available amount for top-up, which can be found near the “Process Payment” button. iv.Enter the required top-up amount for the relevant cardholder account. v.Confirm the top-up by clicking the “Top Up” button.
<span data-metadata=""><span data-buffer="">4.Bulk Top Up For Accounts<span data-metadata="">
i.Open the Accounts page within the Organization module. ii.View the list of cardholder accounts under the Bulk Top Up tab. iii.Check the status of the available amount for top-up, which can be found near the Process Payment button. iv.Review the suggested top-up amount for each account, which will be displayed accordingly. v.Select the desired accounts in bulk for the top-up process. vi.Confirm the bulk top-up by clicking the Bulk Top Up button. Note: Cardholder accounts with available amounts less than their maximum purchase limit over time are eligible for bulk top-up.
<span data-metadata=""><span data-buffer="">5.Transfer Amount From Org. account<span data-metadata="">
i.Open the “Accounts” page within the “Organization” module. ii.Click the “Process Payment” button to view the available options, including “Request Payment” and “Transfer Amount”. iii.Select “Transfer Amount” to initiate the transfer process, which will open a modal window. iv.Choose the “Recipient” account and review the details, including the available amount and maximum purchase limit over time. v.Enter the transfer amount according to the instructions provided in the info icon. vi.Provide a valid reason for the amount transfer. vii.Click on the “Transfer” button to complete the process.
6. <span data-metadata=""><span data-buffer="">Steps to Request Payment<span data-metadata="">
i.Open the “Accounts” page within the “Organization” module. ii.Click the “Process Payment” button to view the available options, including “Request Payment” and “Transfer Amount.”
iii.Choose “Request Payment” to initiate the payment request process, which will open a modal window.
iv.Review the suggested payment amount, which can be edited if necessary.
v.Carefully read the instructions and click the “Request button” to submit the payment request.
vi.To authorize the payment request, click the “Authorize Payment “button to open the third-party payment modal window. Alternatively, you can use the” Terminate” button to cancel the request.
vii.Enter the required details in the third-party payment modal to successfully complete the payment authorization process.
Payments
1.All payment requests made through the Accounts page are listed here, providing administrators with a centralized view of outstanding payments. From this page, administrators can also take action on previously unprocessed payments by: •Terminating payments that are no longer required •Authorizing payments that were pending approval
2.The filter enables administrators to efficiently filter the payment request page based on various payment statuses, allowing for streamlined navigation and management of payment requests.
3.Administrators can utilize the date-based filtering option to specify a range of dates for viewing payment requests. This allows them to view payment requests within a particular timeframe, providing a clear and focused view of payment activity.
4.The administrator can revisit this page if they were unable to authorize or terminate a payment request earlier. To authorize the payment request: – The administrator can click the Authorize Payment button to open the third-party payment modal window. Alternatively, they can use the Terminate button to cancel the request. – To complete the payment authorization process, the administrator should enter the required details in the third-party payment modal and follow the prompts to successfully finalize the payment.