The cardholder portal provides a web-based interface for cardholders to perform tasks that are also available in the mobile application. This is particularly useful for those who do not have the mobile application or are experiencing issues with their existing mobile application.
Using the portal, cardholders can primarily:
View their transactions
Submit transaction details
Manage their card-related tasks
SIGN IN
1. Sign In
The sign-in screen enables the cardholder to provides a secure access point to the portal containing the important pages and features for managing their expenses.
Cardholder will be redirected to the sign in credentials input page..
2. Language
Cardholder can change the language setting for the portal using the feature available on the sign-in page.
3. Information Resource Links
Cardholder can access information related to:
Privacy Policy
Terms and Conditions (T&C)
Support
3D Secure FAQs
by clicking on these links. They will be redirected to the relevant pages.
Dashboard
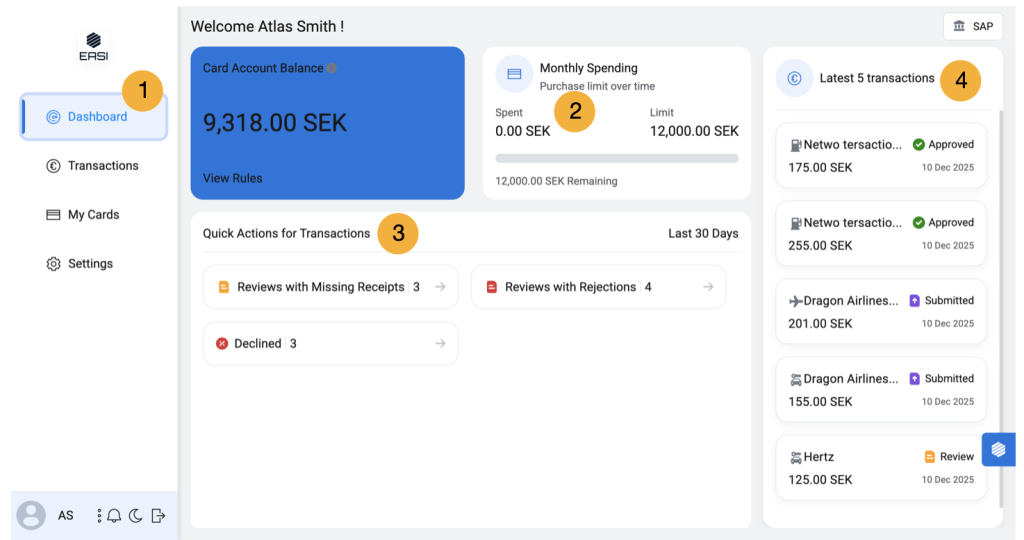
1. Dashboard
Default landing screen of the portal. Cardholder can view their spend graph related to amounts allotted to them, view rules , access transaction details which are of priority in terms of task
2. Spend Graph
To view the status of the amount in terms of spent and remaining spend limit related to maximum purchase limit over time.
3. Quick Links
The quick links will allow user to easily access the required transaction details which are important to them. It also helps user to know how many Review and Review ( R) are there which are important for submission or resubmission.
4. Latest 5 transactions
Provides quick access to the transaction detail page of latest 5 transactions.
Notifications, Chatbot
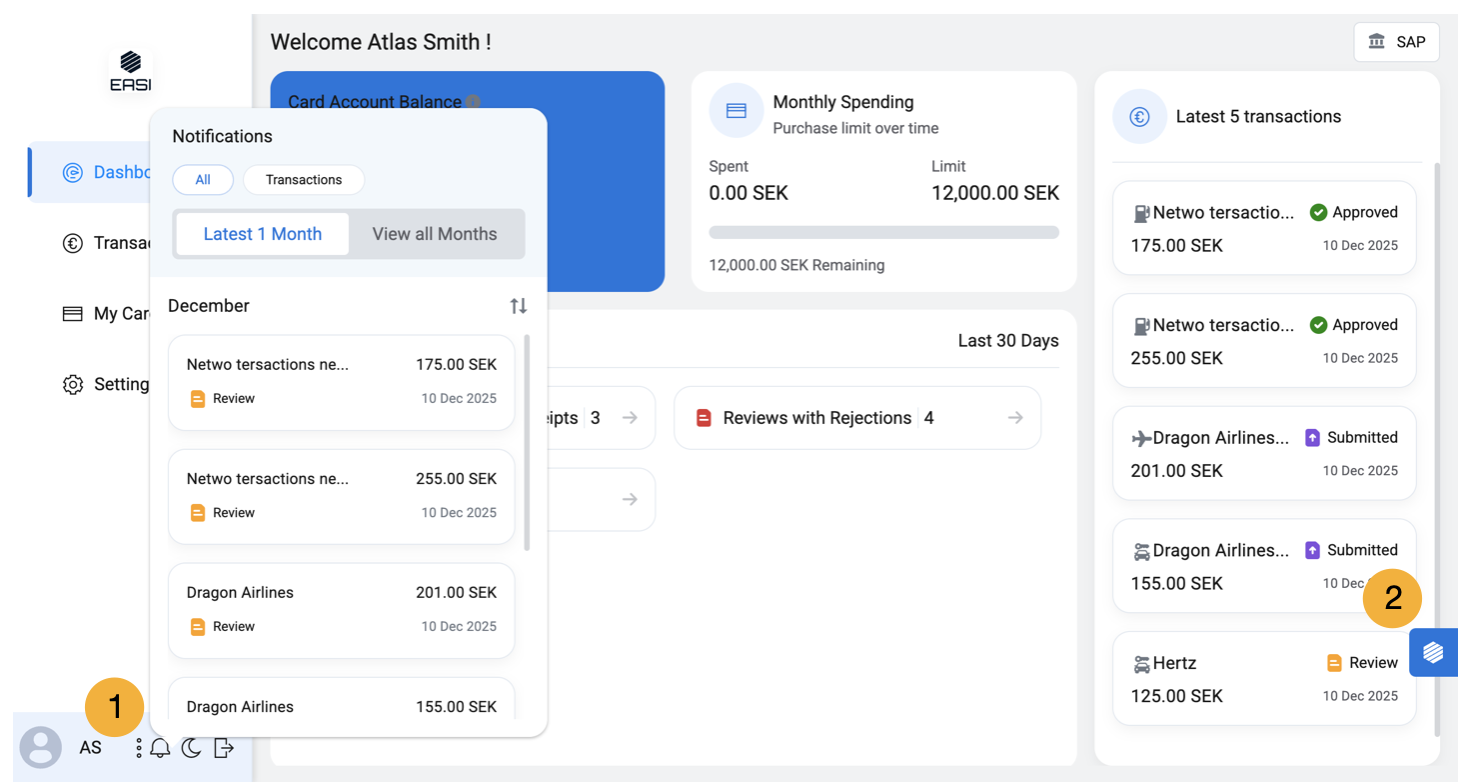
1. Notifications
To view all types of notifications or only those which are related to transactions. They can view the content which are latest 1 month or all months. For “Transactions” notifications , only transaction related updates will be shared. For “All” notifications , the important updates will also be notified along with transactions.
2. EASI Guide Chatbot
Assists users in understanding features, navigating through processes, and providing help and support.
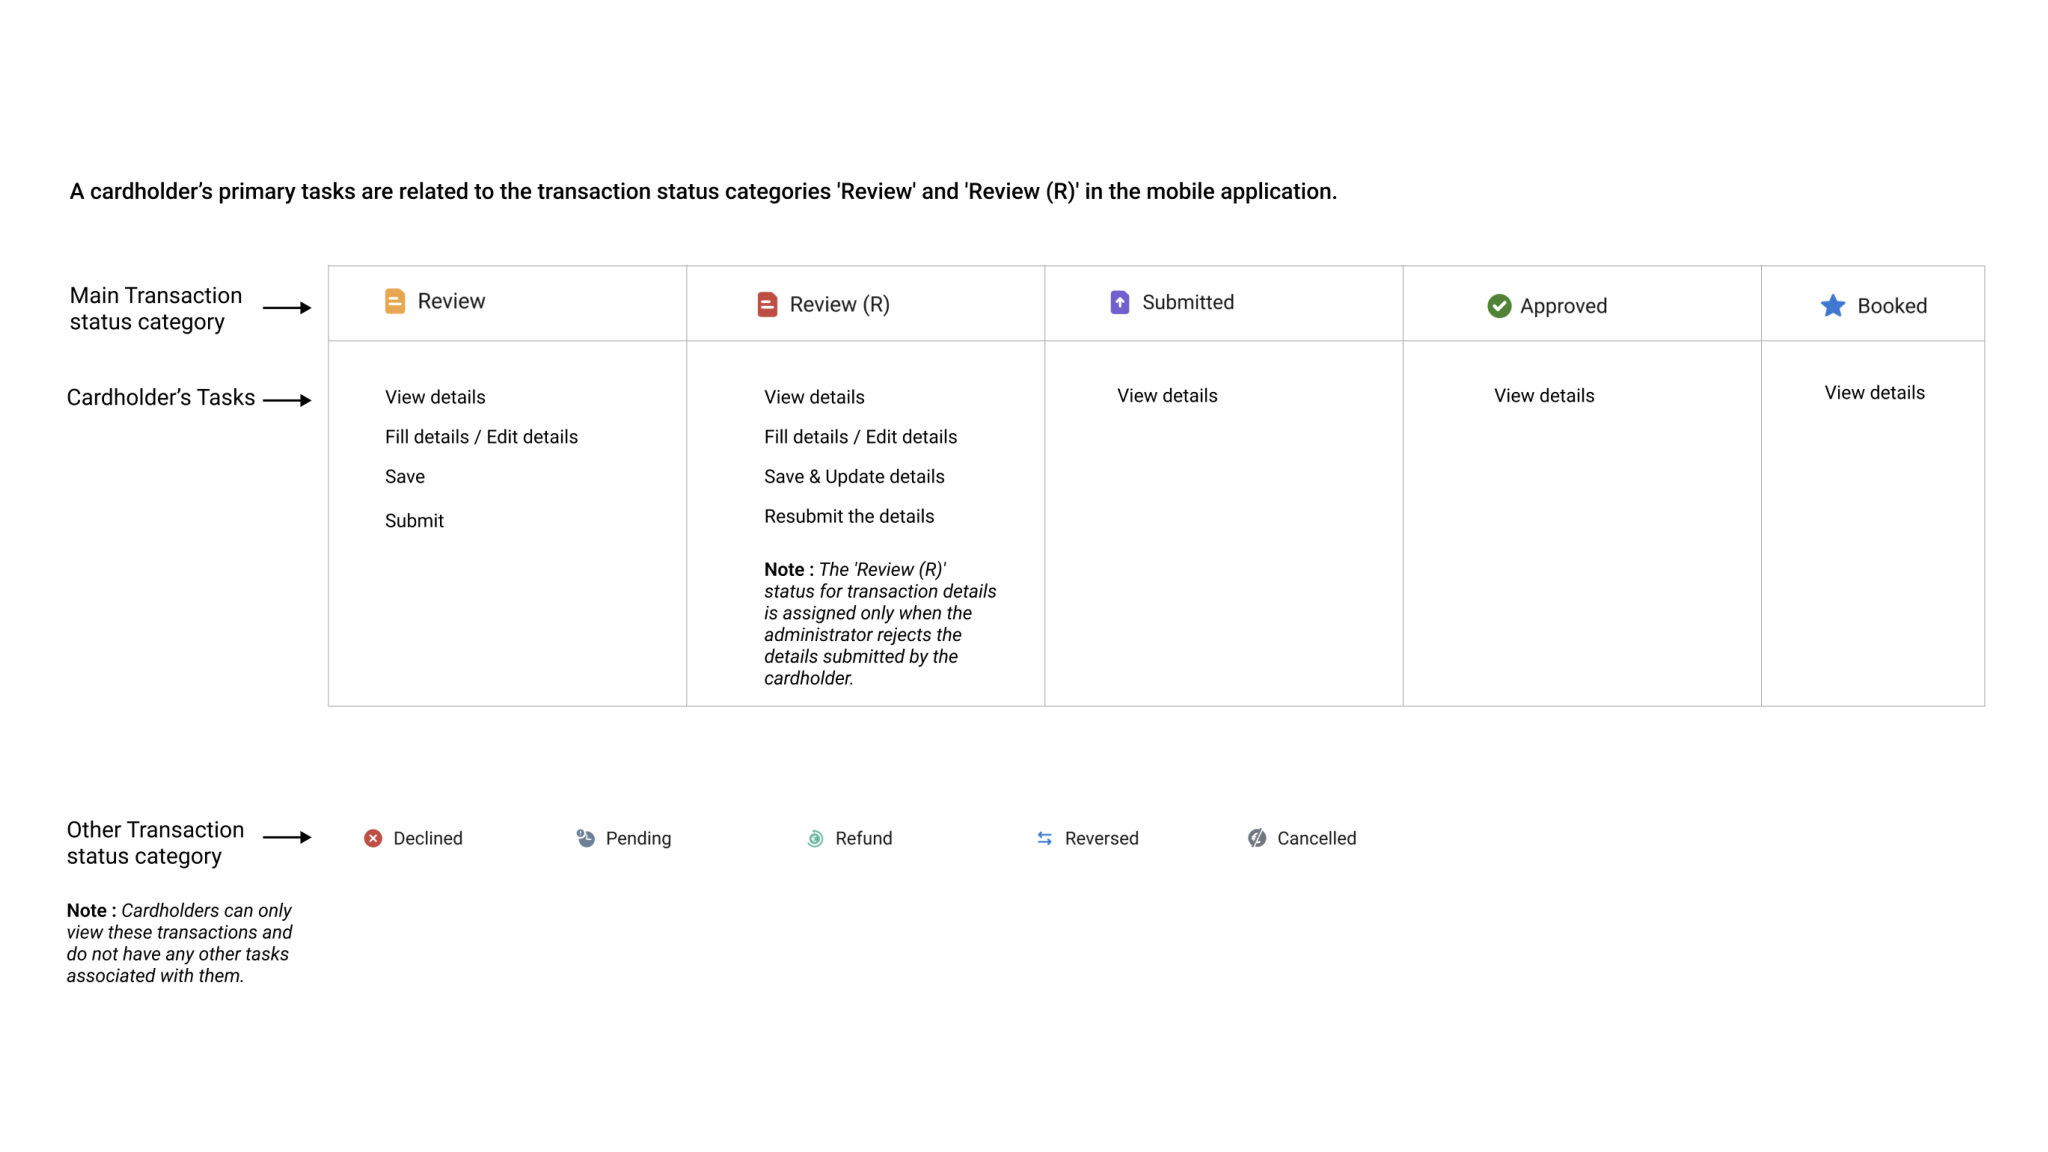
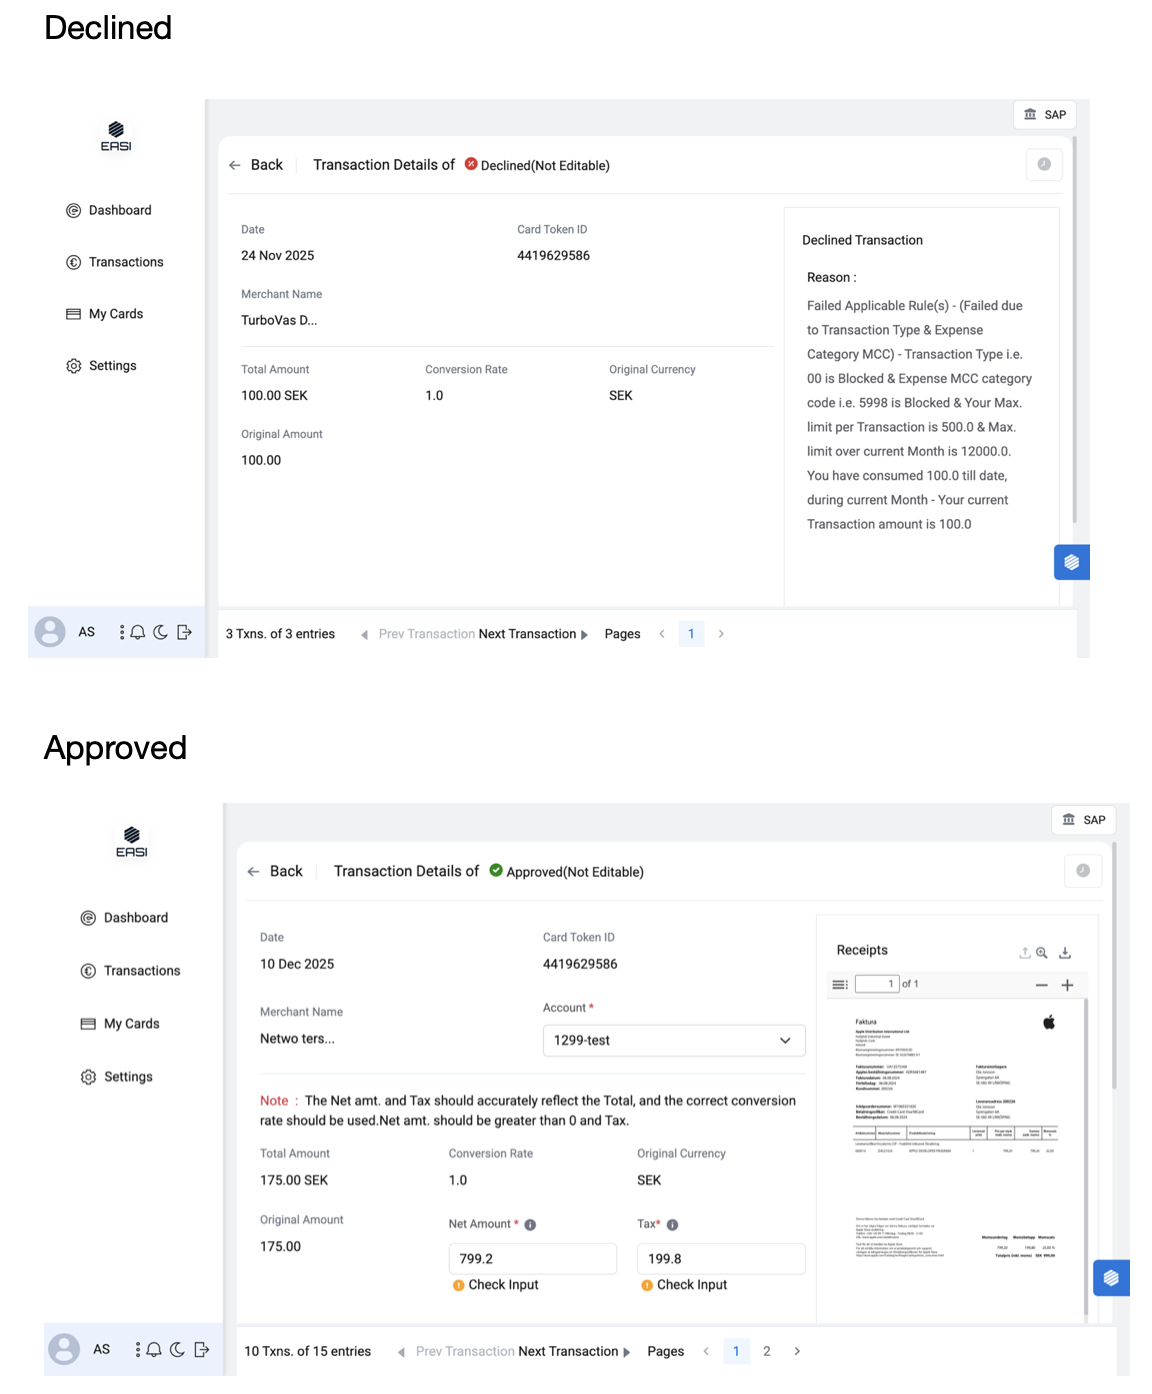
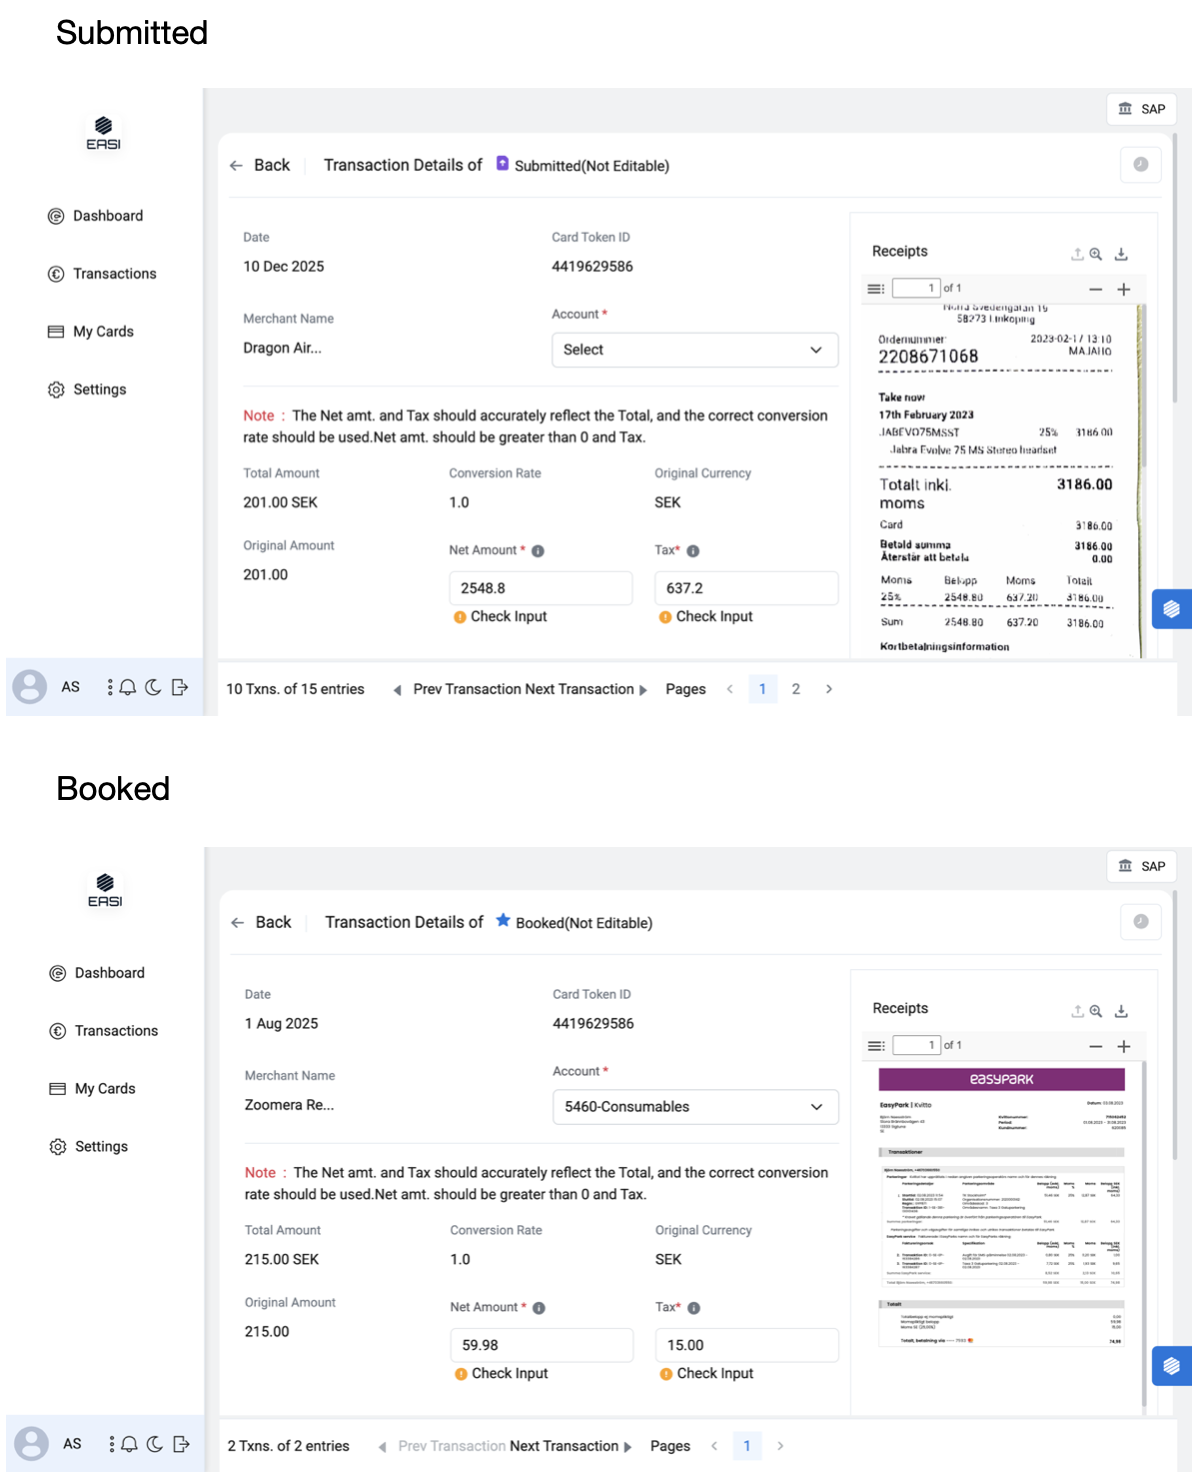
Transaction status
Transactions
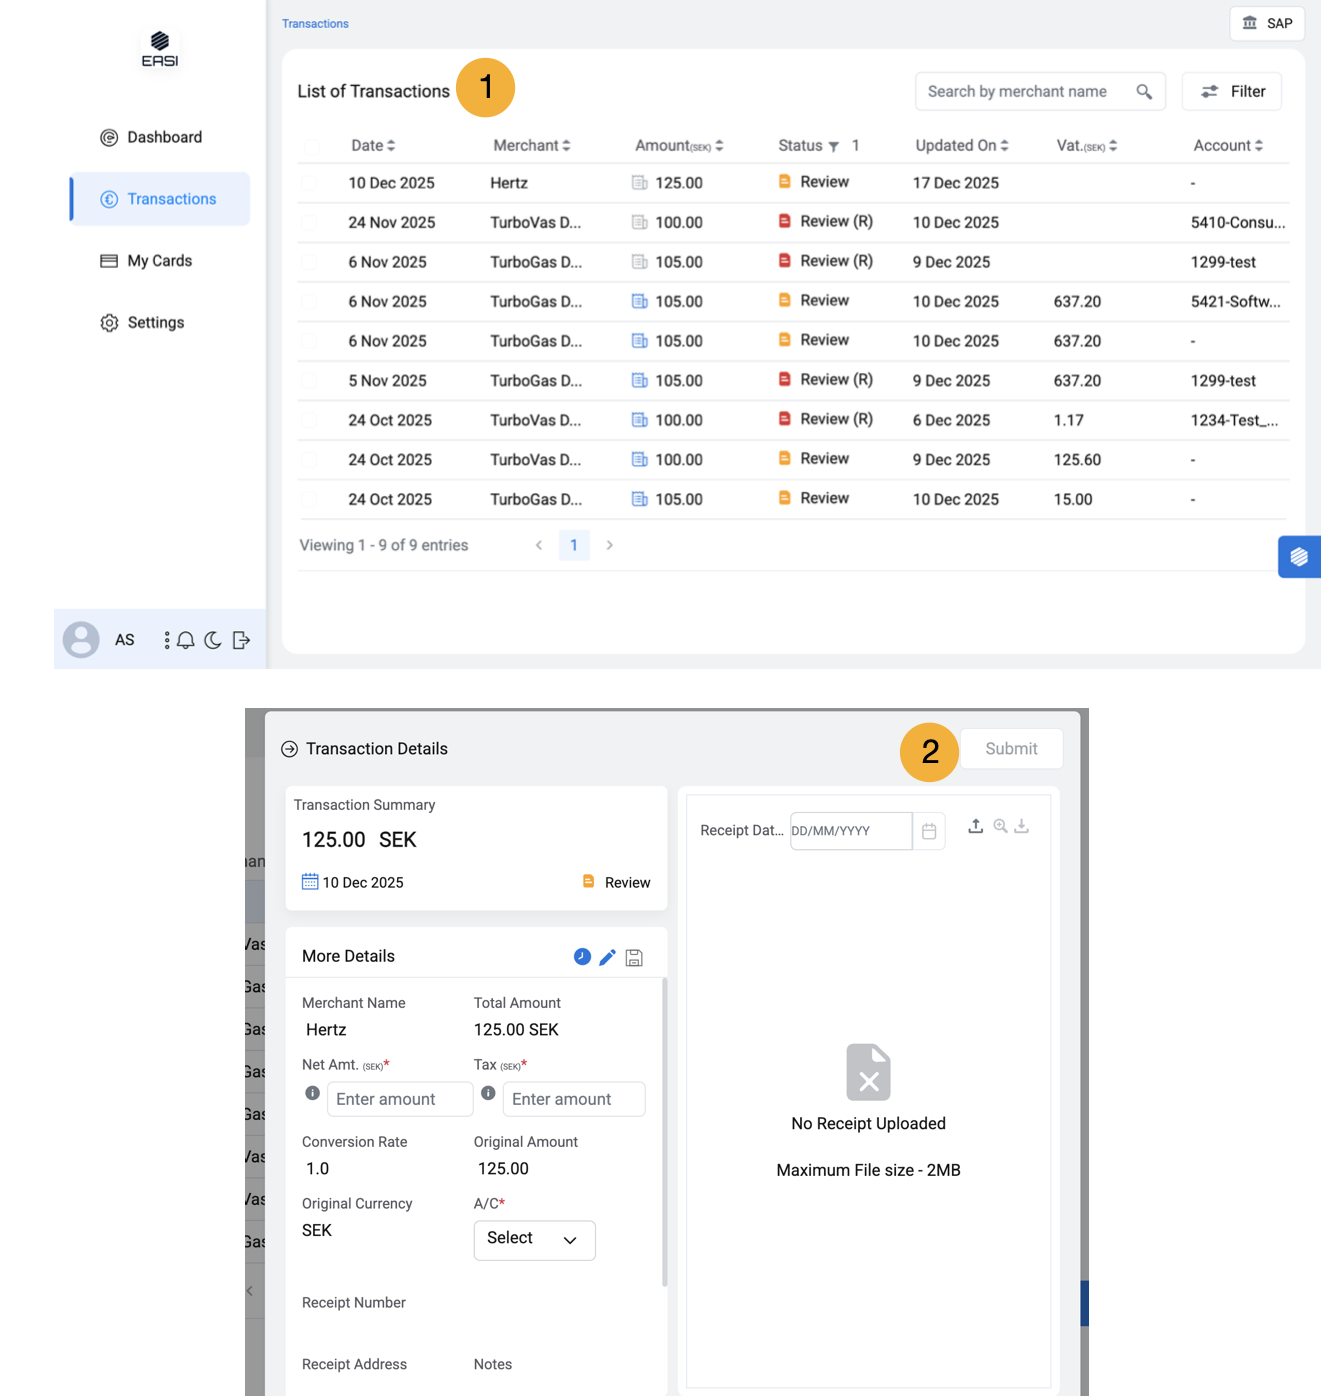
1. Transactions:
The transactions page shows a list of transactions with different statuses and their details. A cardholder can submit / save transactions details which will be reviewed by the admin. The default transaction list will display entries with a Review status. Filter can be removed as per requirement.
2. Submit Details
i.Open the “Transactions” module to view the list of transactions. By default, only transactions with a “Review” status are displayed. Use the status filter to display transactions with other statuses if needed. ii.Select the transaction with the “Review” status for which you wish to submit details. iii.Fill in the mandatory fields required for submission. iv.Review the information to check for any errors. v.Click the “Submit” button to complete the process.
Note: You can also save the details if you wish to submit them later. Details such as Net Amount and Tax are auto-populated by OCR once the receipt is uploaded, so please cross-check the content to avoid errors
Transactions Details
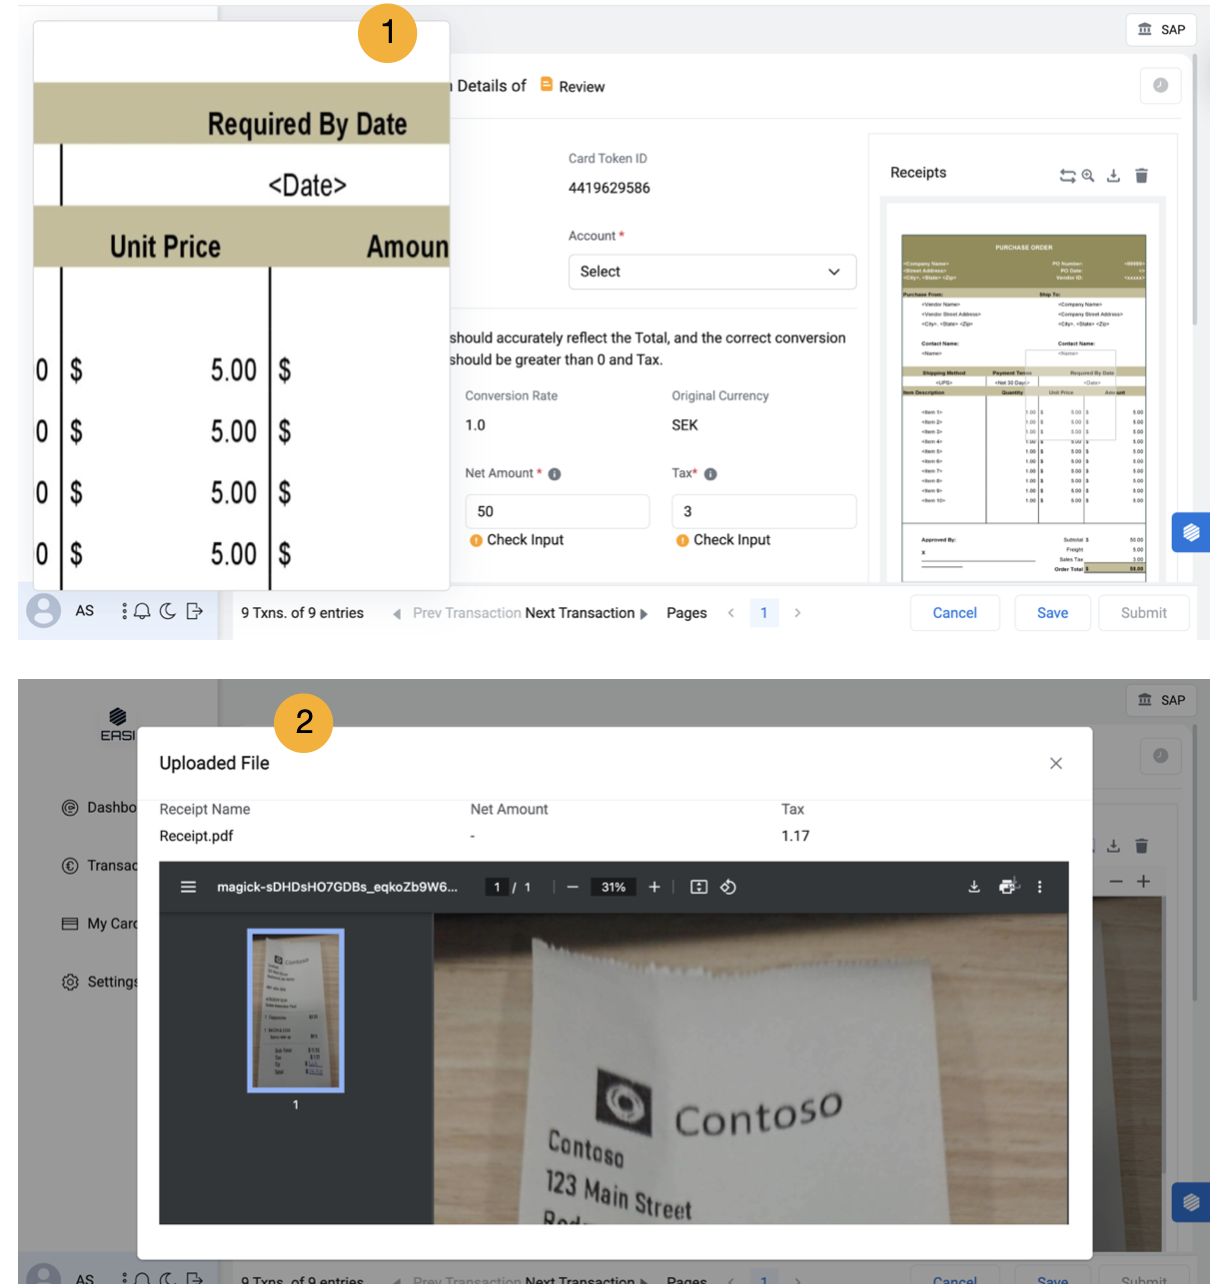
1. Edit & Save Details
i. Open the “Transactions” module to view the list of transactions. By default, only transactions with a “Review” status are displayed. Use the status filter to view other transaction statuses if needed. ii. Select the transaction with the “Review” status that you wish to edit. iii. Click the “Edit Details” icon next to the “Transaction Details” heading to access the edit page. iv. Make the necessary changes in the details. v. Click the “Save” button to save your changes.
Note: i.”Save” button will be enabled when changes are made. ii. If you navigate away from the page before saving, recent changes may be lost. Only transactions with “Review,” “Review (R),” statuses are editable.
Receipt
1. Magnified Receipt Image View
Hovering over the receipt image will display a magnified portion for enhanced clarity, as needed.
2. Uploaded File Modal Window
This window provides a clear view of essential data and is optimized for displaying receipt images in a larger size. It opens when you click the magnifying icon next to the Receipts heading.
History
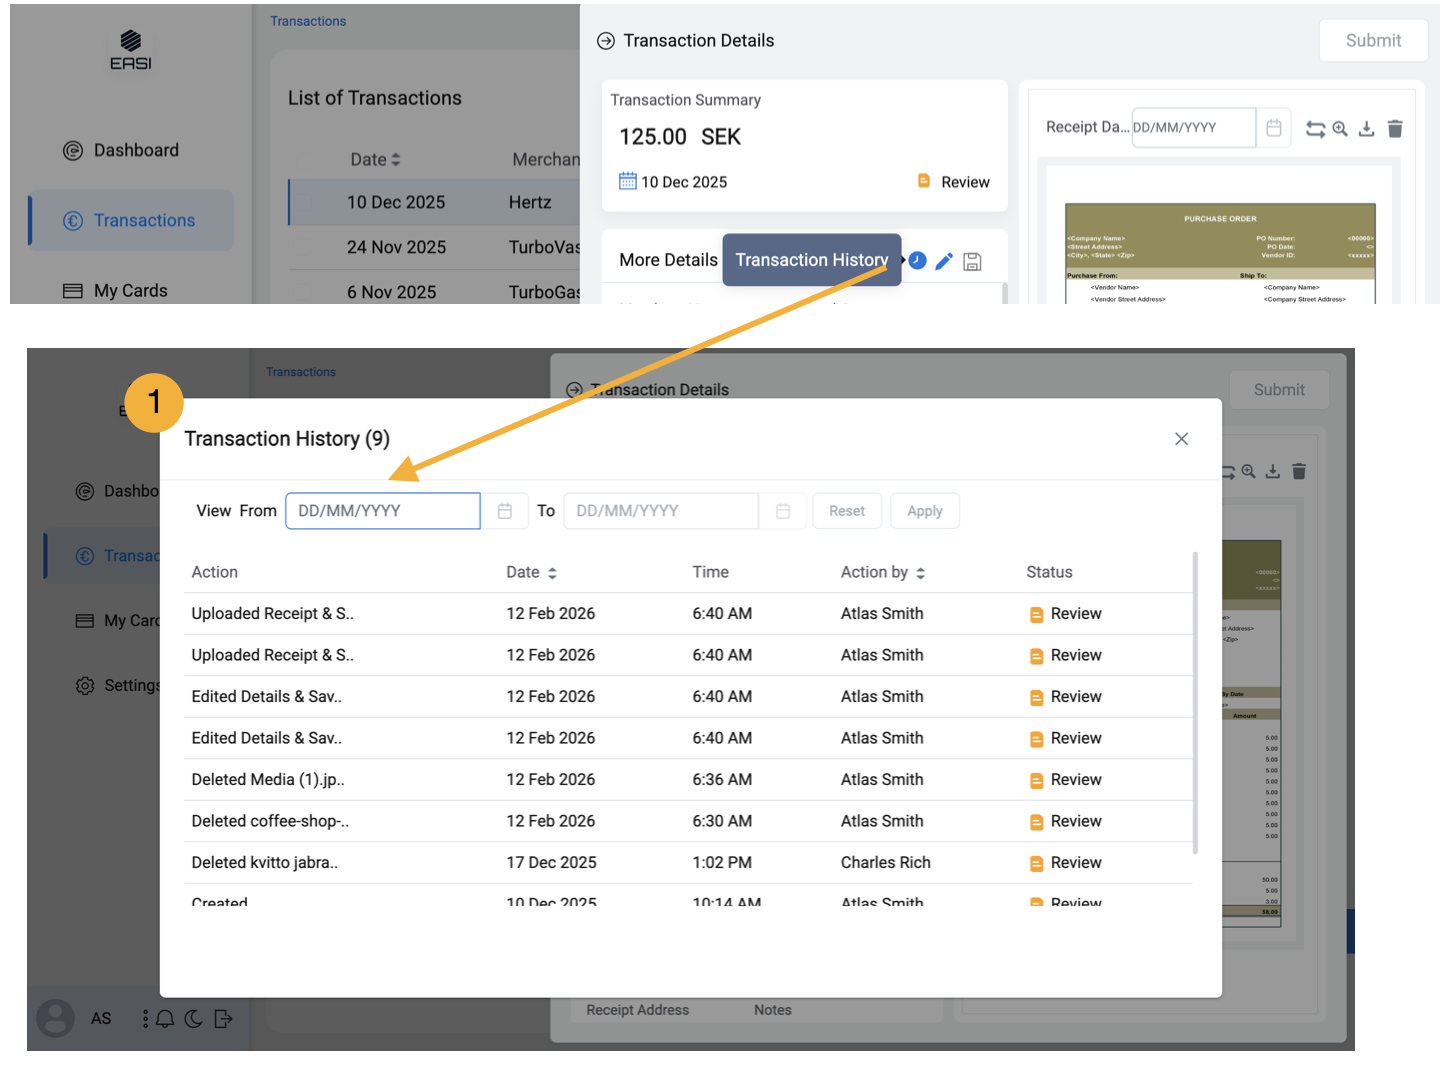
1. Transaction History
Transaction history is to view all actions and outcomes related to specific transactions, including the performer of each task Upon clicking the transaction History icon, it will open a modal window displaying detailed information. Notes related to rejected transactions are also included.
Filters
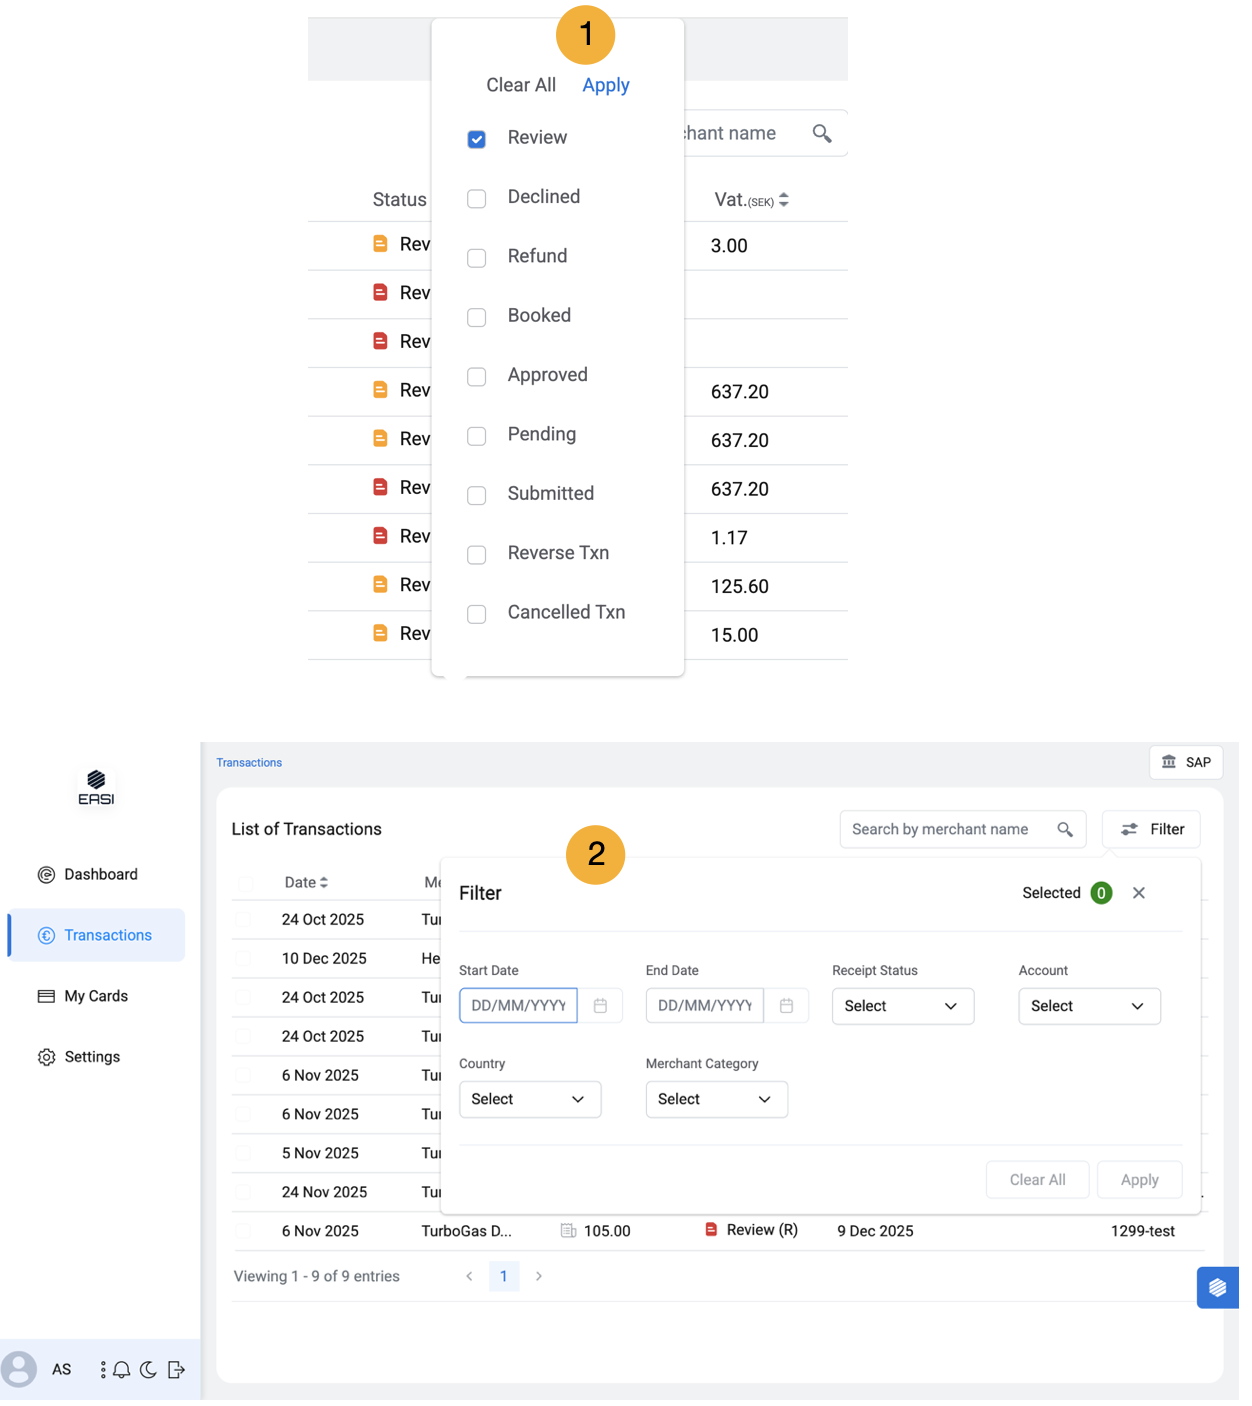
1. Status Filter
The transaction list can be filtered by transaction status, allowing selection of one or multiple statuses as needed.
2. List Filter
An admin can filter the transaction list based on available parameters.
Other Transaction Statuses
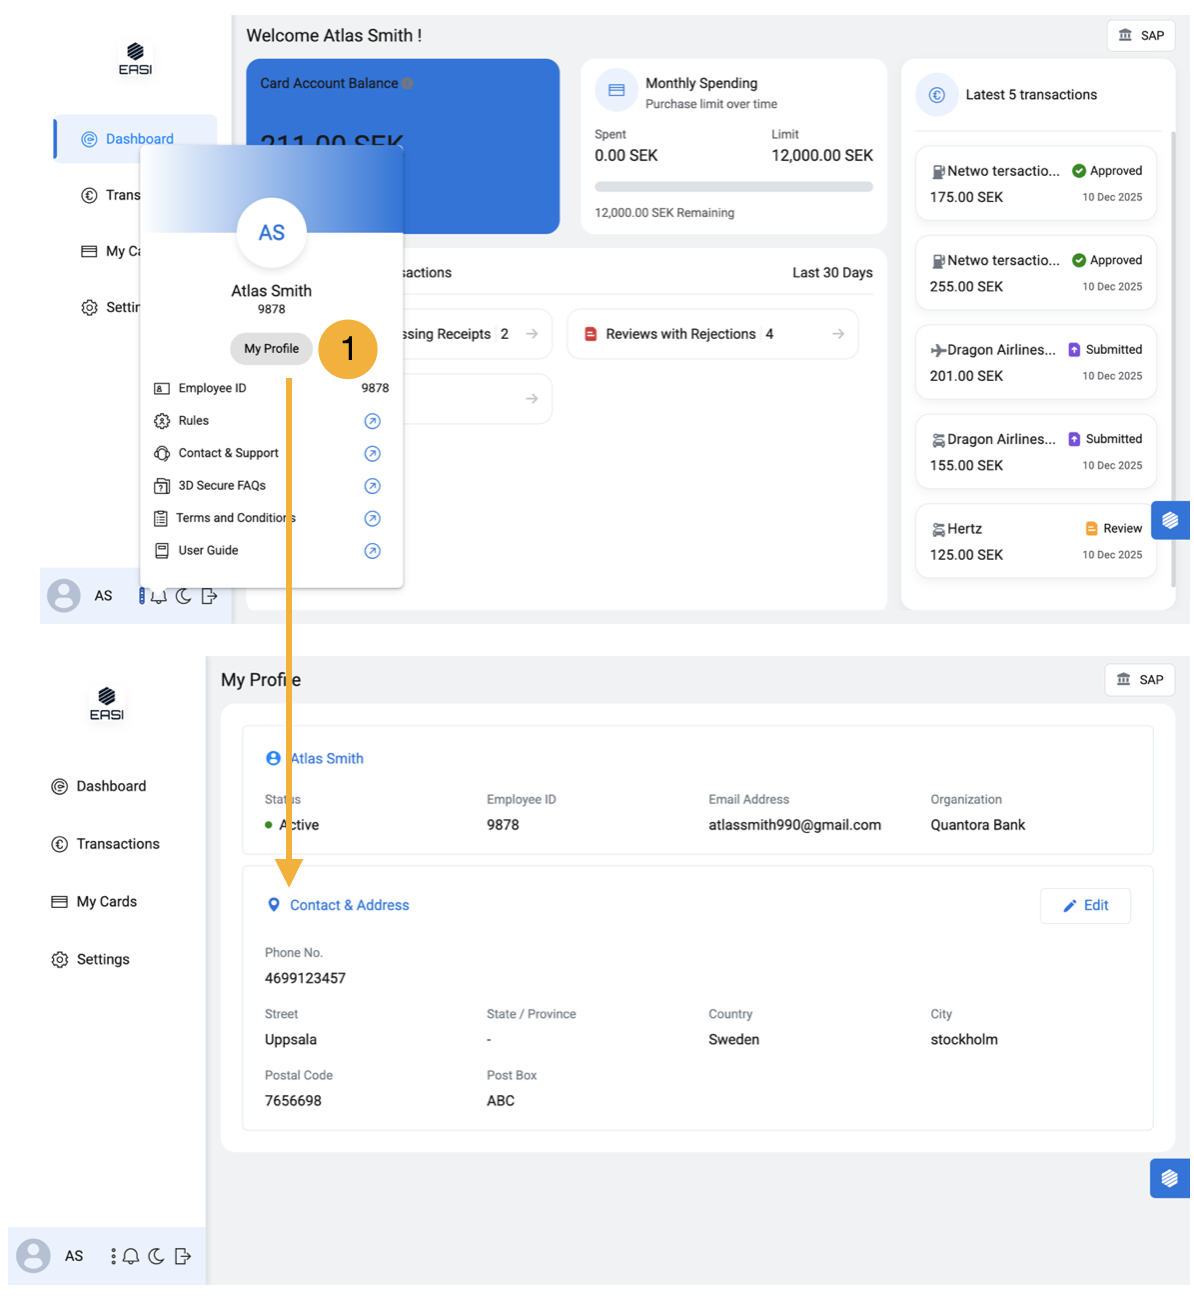
My Profile
1.The Cardholder Profile section provides a comprehensive overview of the cardholder’s details, including their organization, card information, and expense card rules. It can be accessed from the menu which appears upon clicking the profile icon.
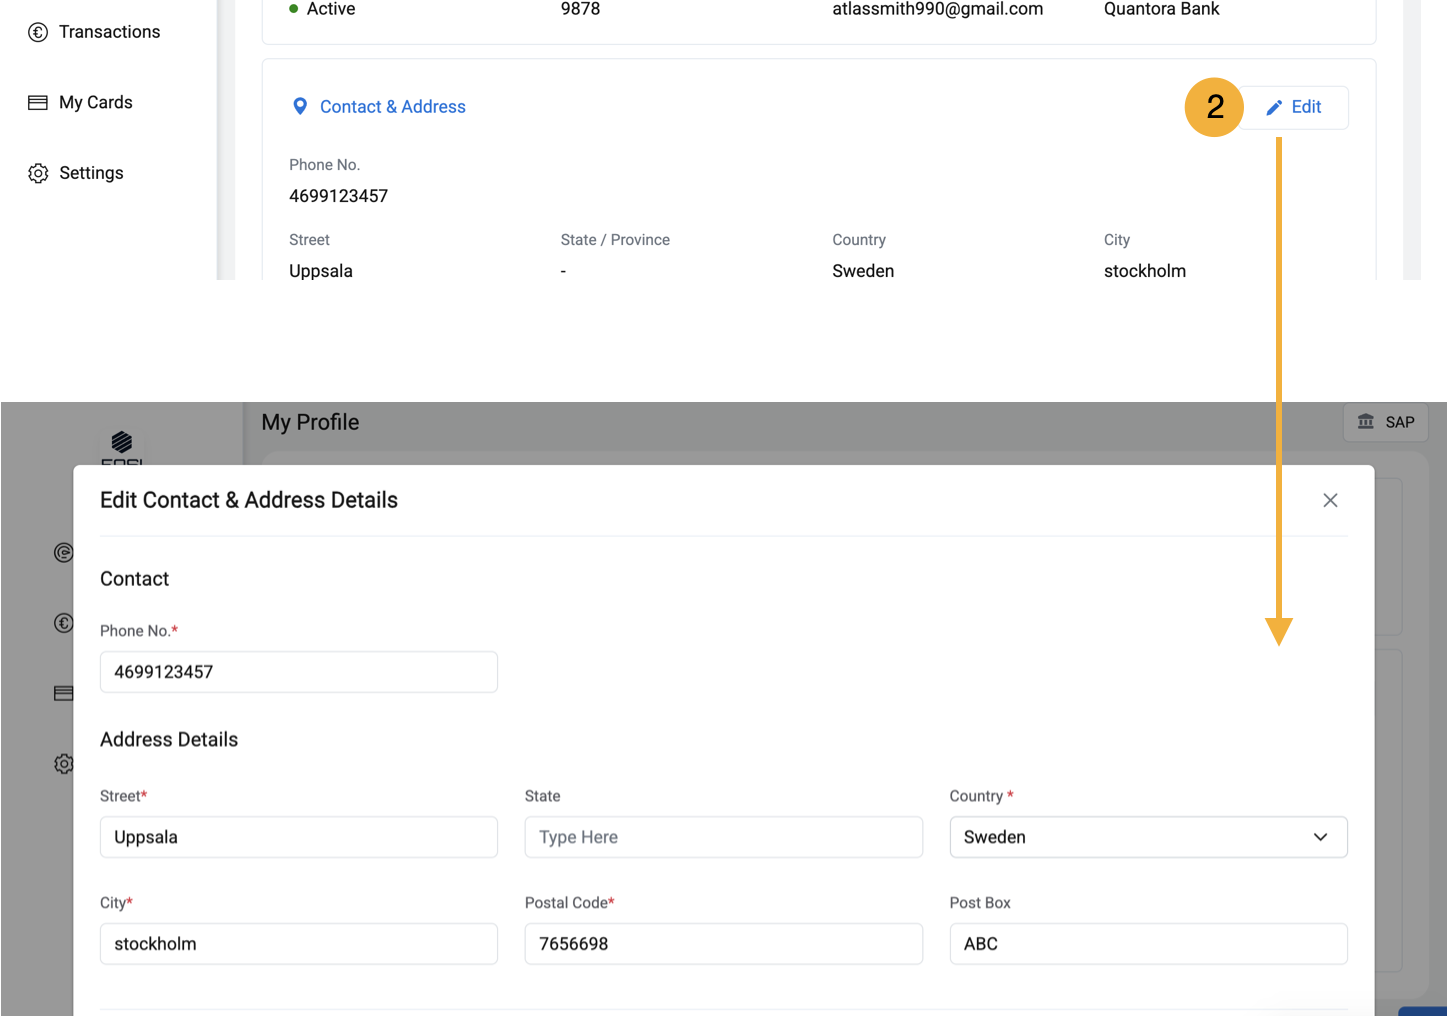
2. Editing Phone Number and Address
To update phone number or address, cardholder should follow the steps below
i.Click on the “Edit” option provided in “Contact & Address “section. ii.Upon clicking “Edit”, the “Edit Contact & Address Details” modal window will pop up. iii.Make the necessary changes to phone number or address. iv.Click on the “Update” button to complete the editing process.
My Card
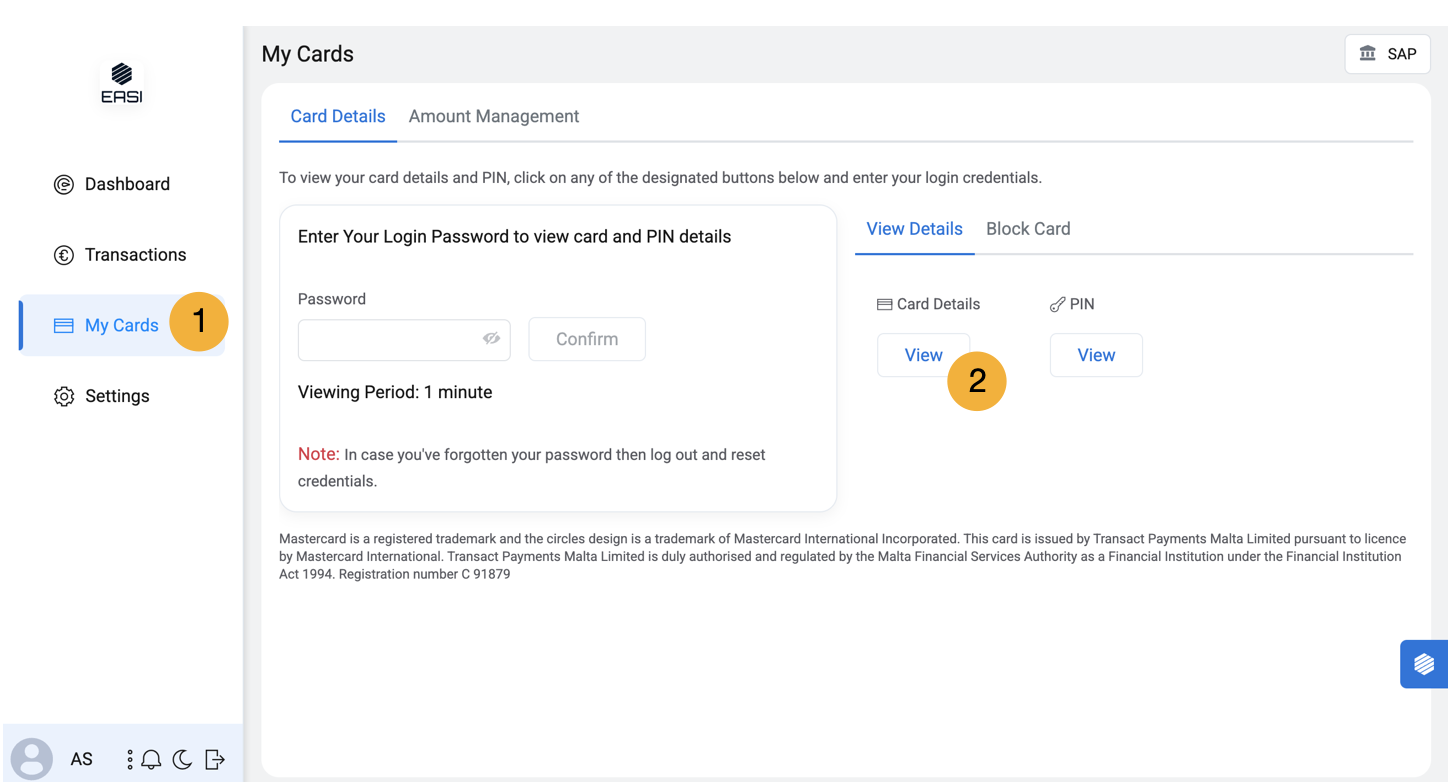
1. My Card
Cardholders can access this page from the “My Cards” module from the left navigation bar, they can view card details and PIN, and have the option to block the card if necessary.
2. Card Details and PIN
Cardholders can access their card details and PIN by clicking on the respective buttons and verifying their identity providing their sign in password. The option to view card details and PIN is only available for activated cards.
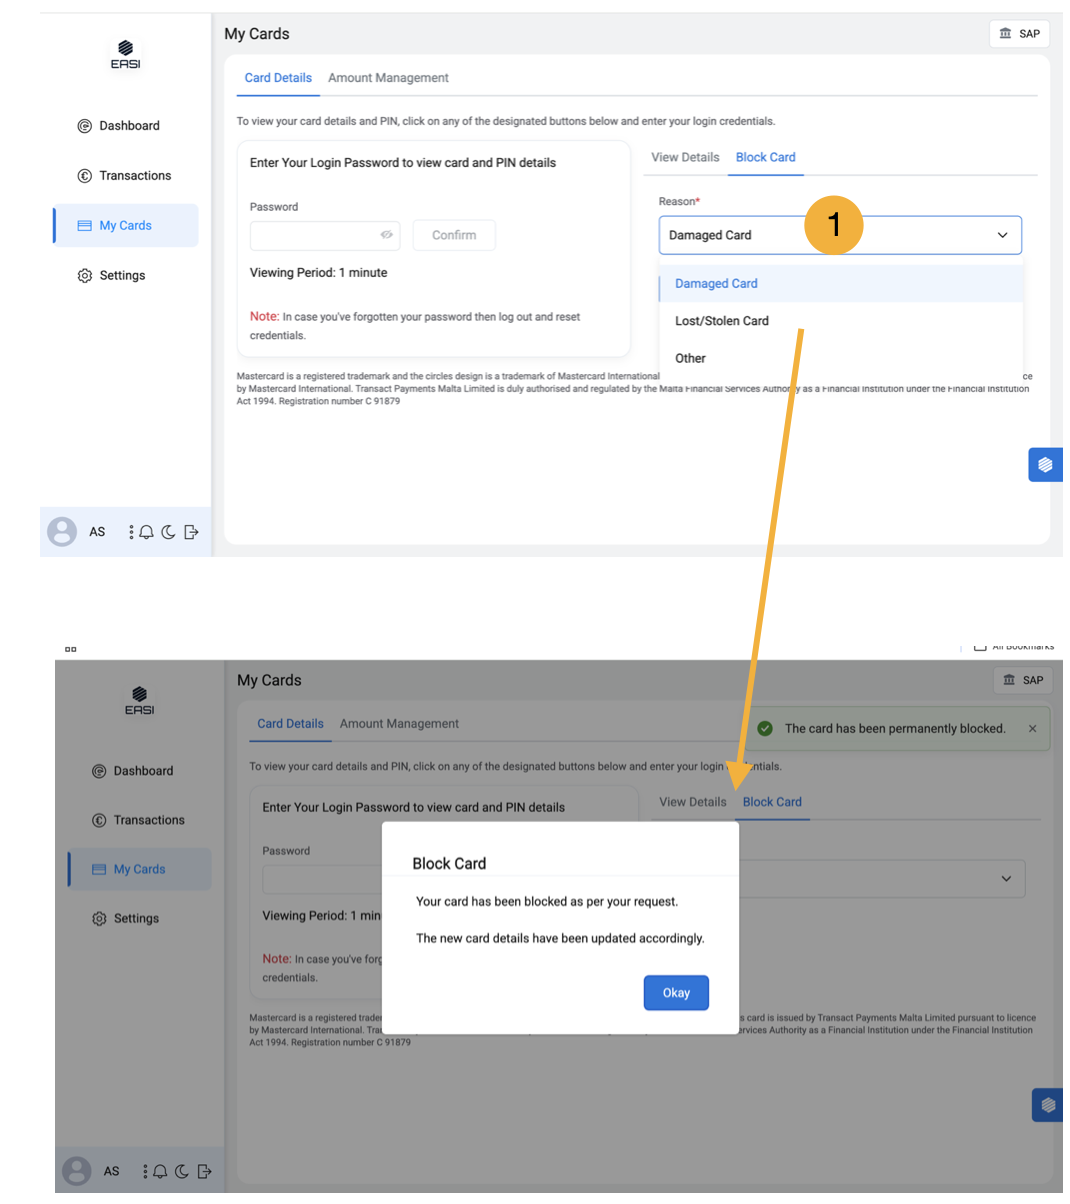
1. Block Card
The Block Card feature, located in the My Cards section, allows cardholders to block their card if it is lost, damaged, or for other reasons. Steps to Follow: i.Sign in to the portal. ii.Go to “My Cards.” iii.Under “Block Card,” provide a reason for blocking the card. iv.Click “Block” to complete the process.
Rules
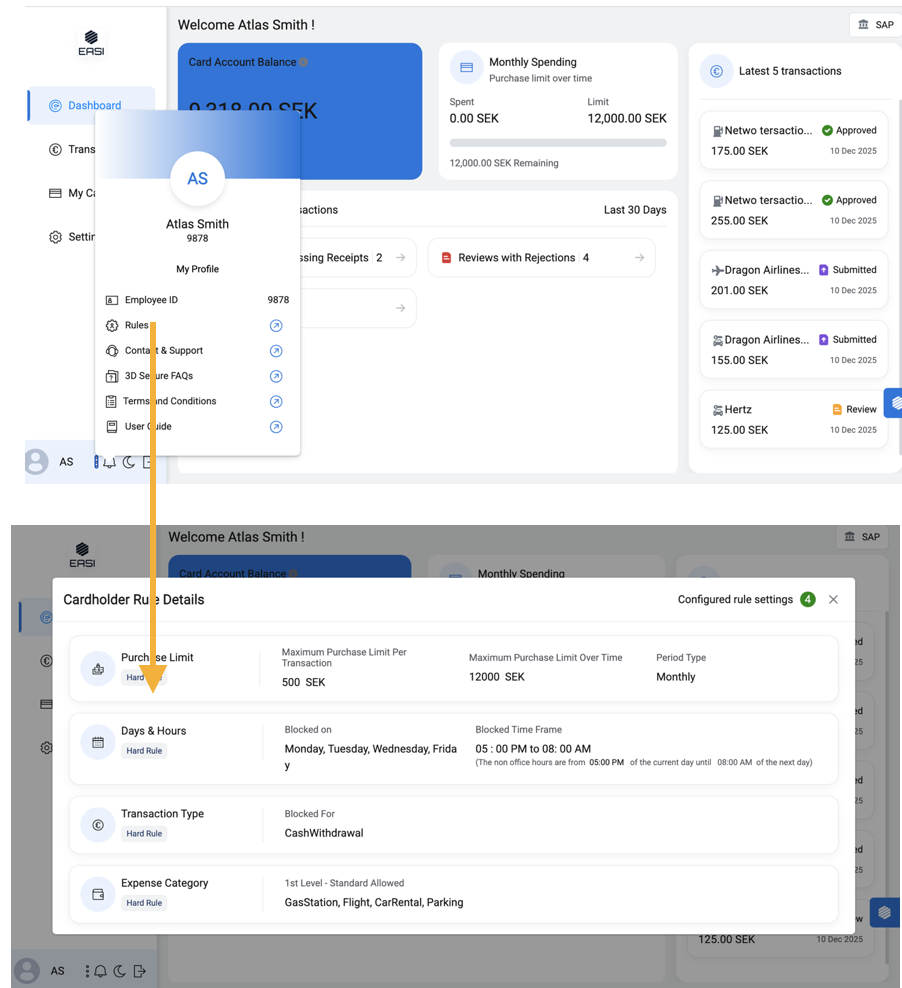
1. Rules
The cardholder can view all the rules governing their expenses on this page. This helps them understand the permissible and non-permissible scenarios, enabling them to make well-managed transactions.
Contact & Support
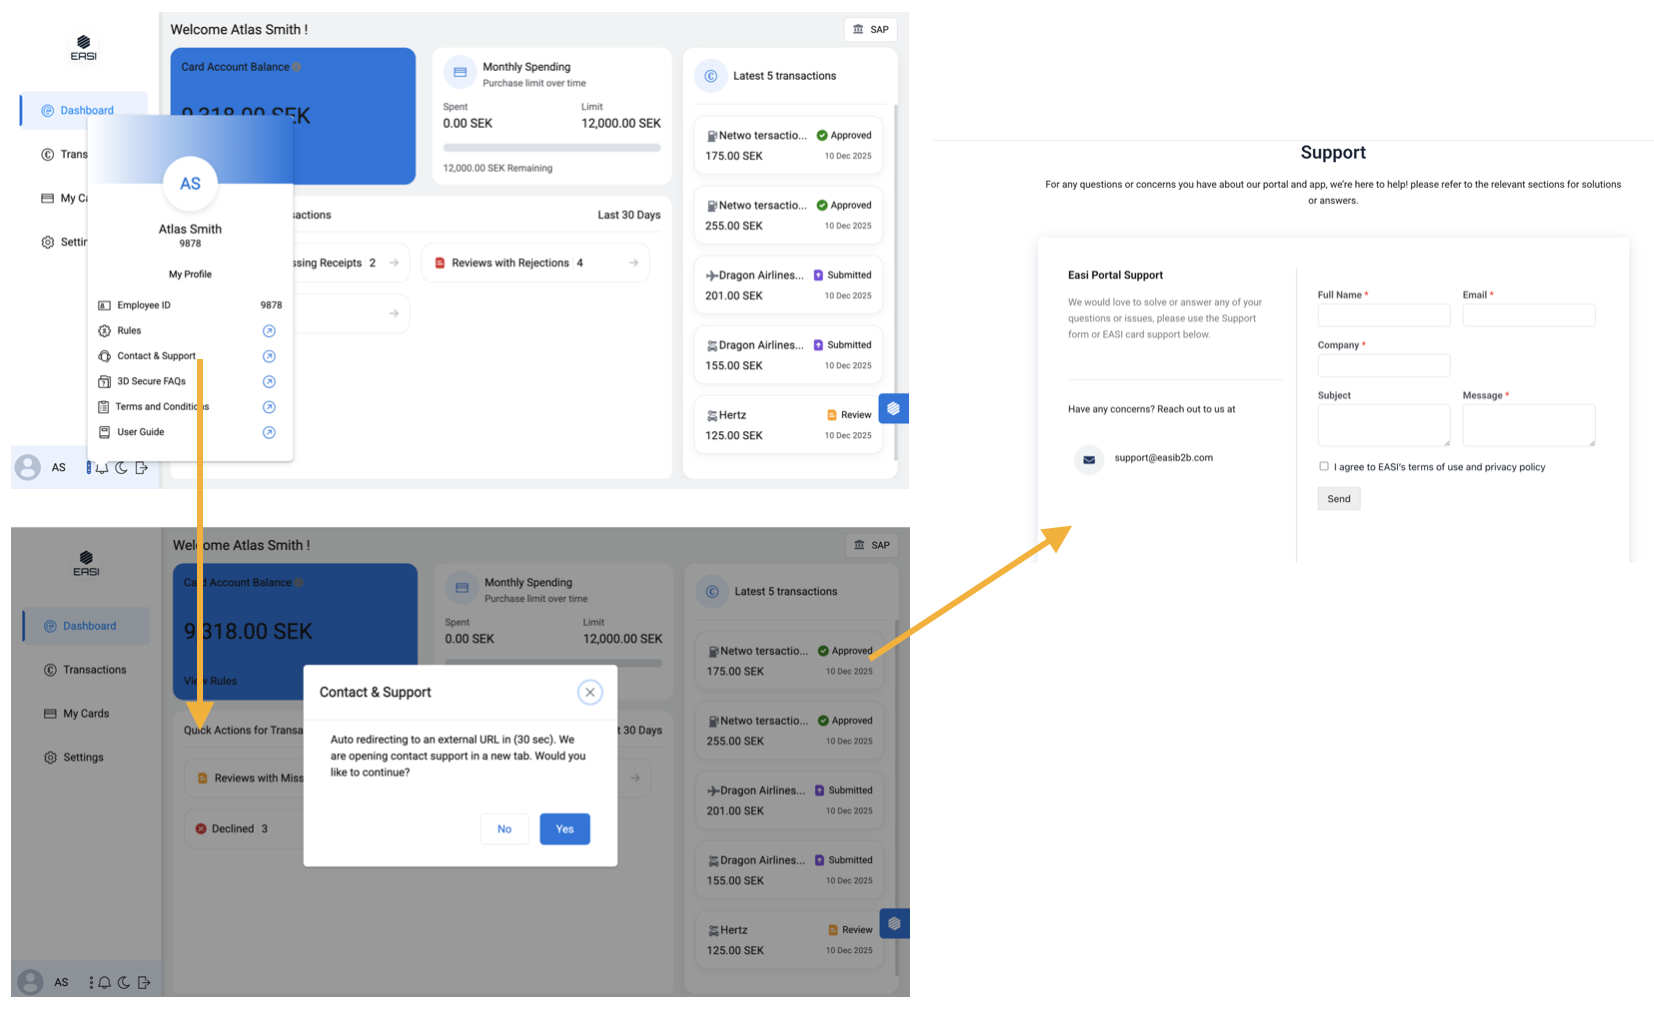
1. Contact & Support
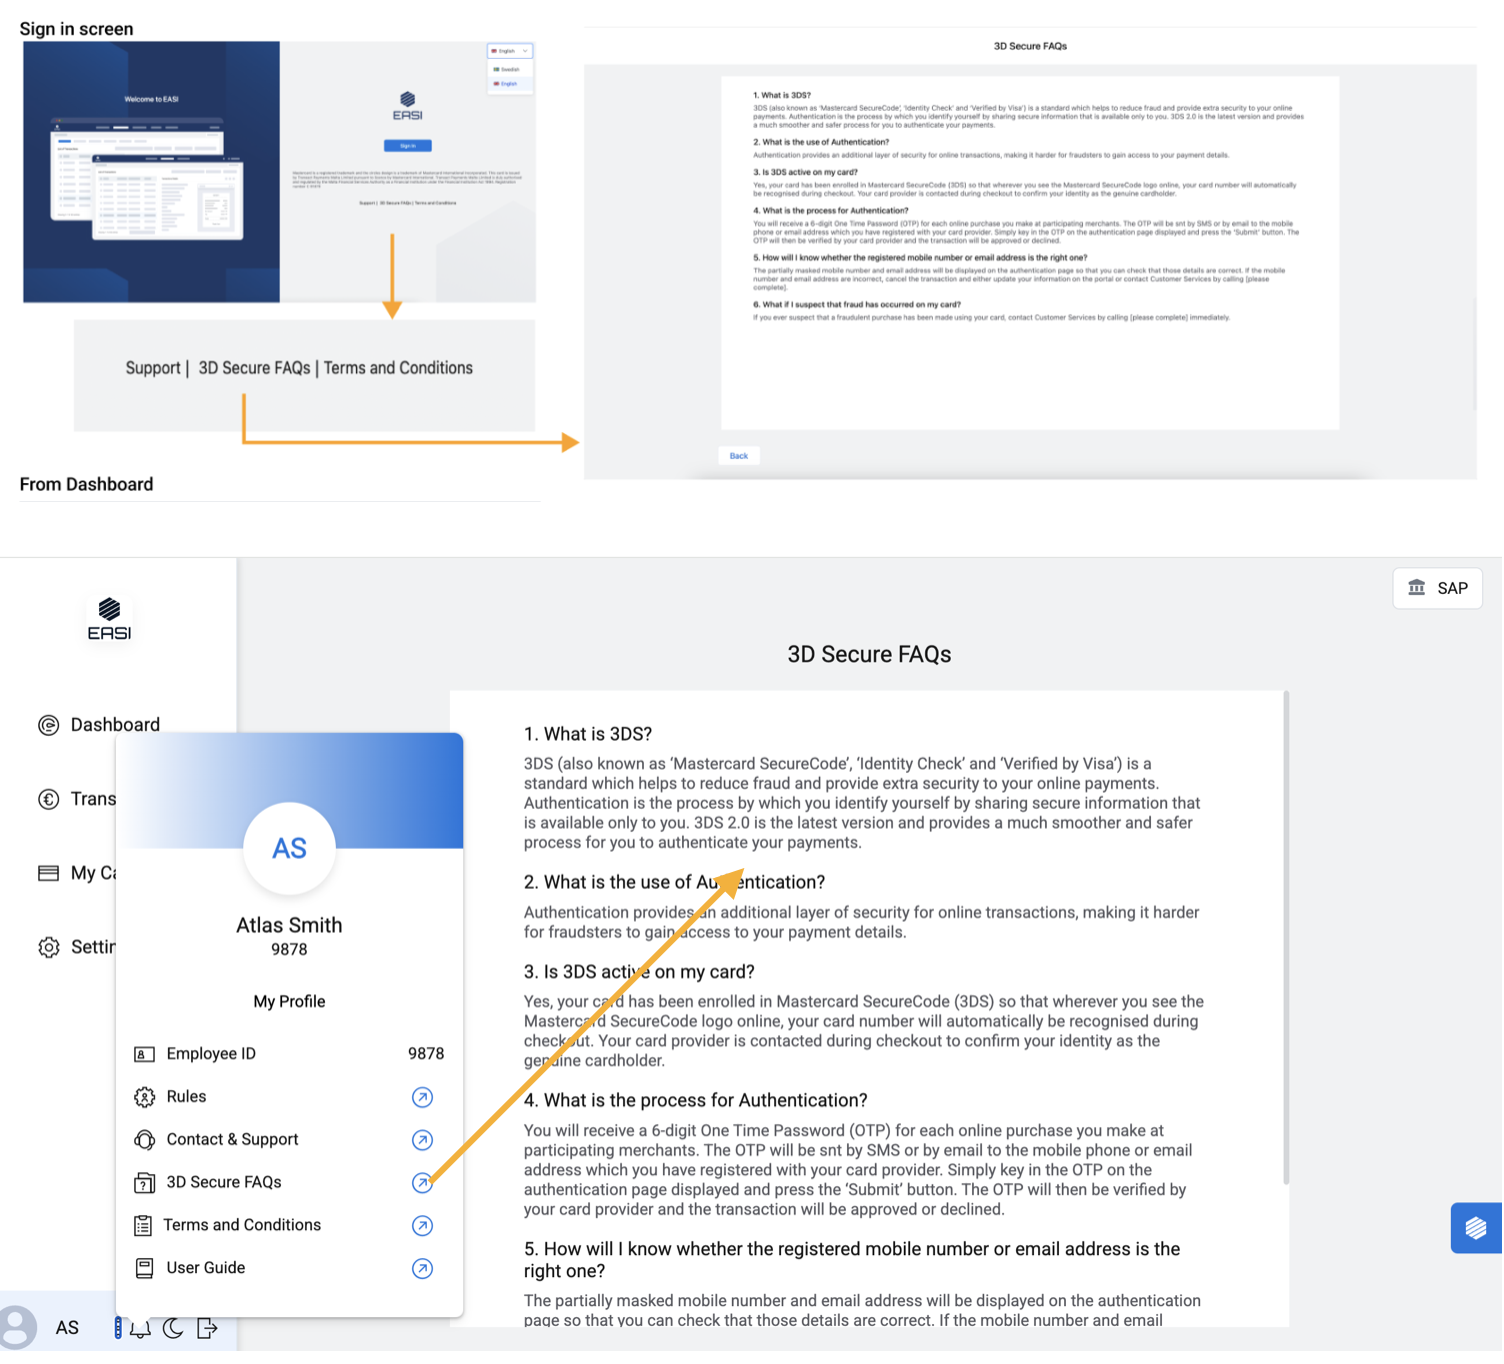
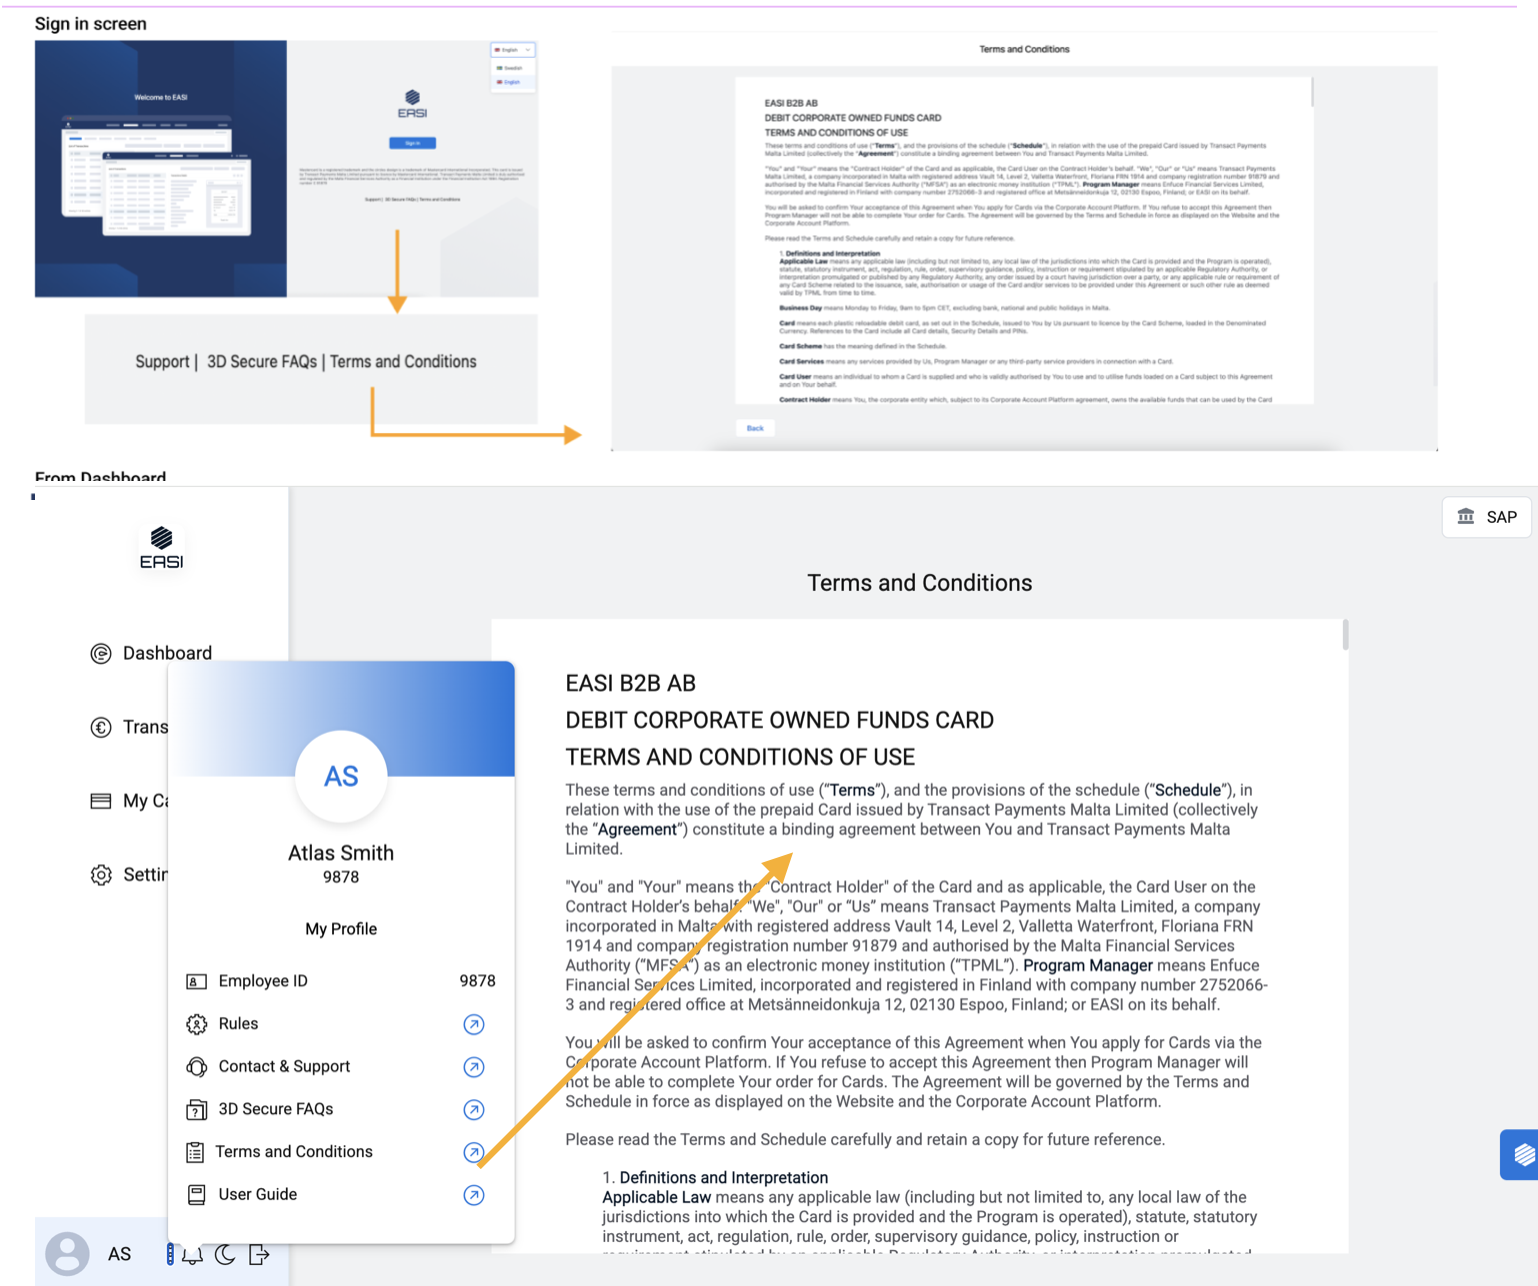
To access Support and 3D Secure FAQs pages, cardholders can click on the given links and it will redirect them to the relevant page in EASI website.
3D Secure FAQs
Terms and Conditions
Top Ups
Understanding Topping up your account
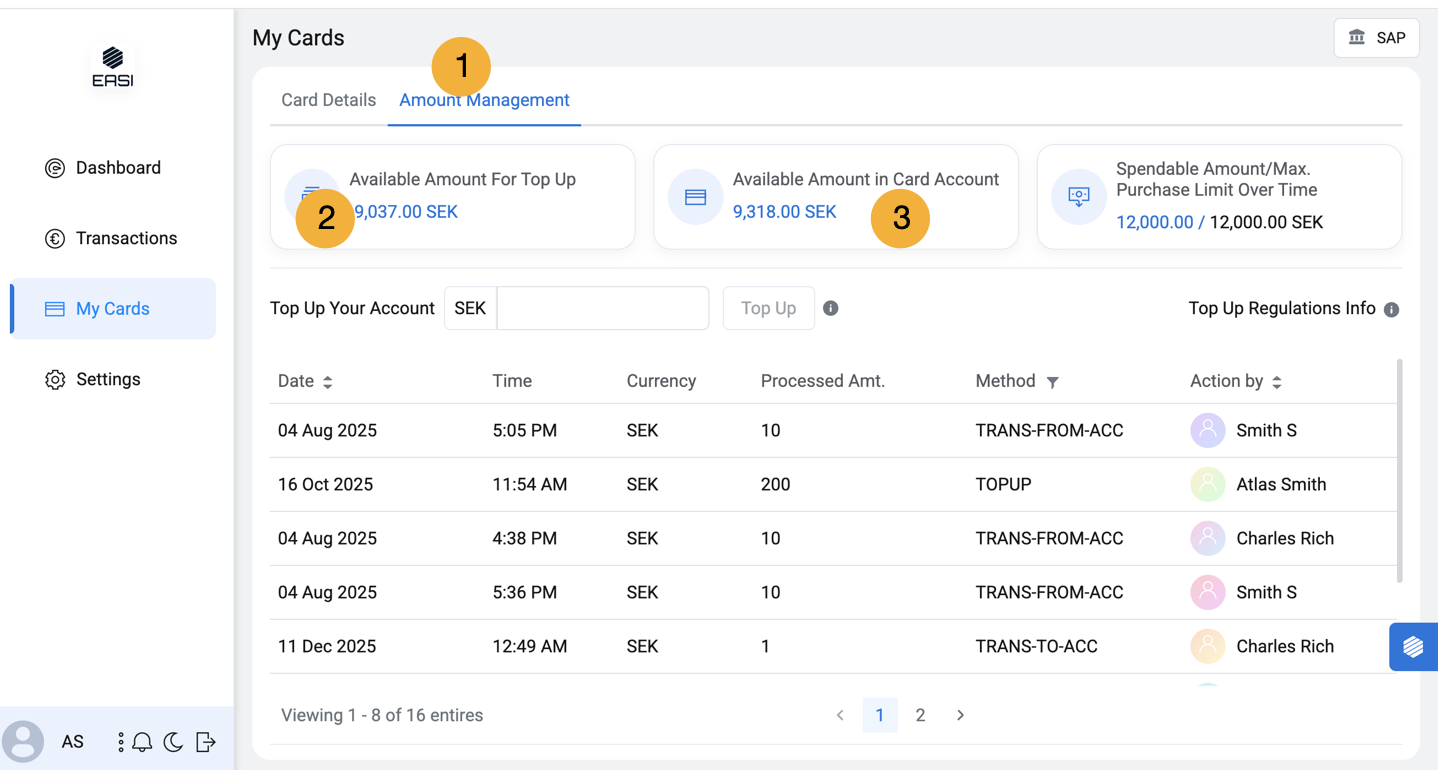
Amount management tab allows you to view key parameters related to topping up on the top right corner. The table also outlines the top up history with key details of the top up The top up amount is dependent on various parameters like : Available amount for top up Available amount in card account Spendable amount/Max. Purchase limit over time
The Available amount is the balance amount left in the CH account and is a key factor to decide what should be the top up amount. It is different from the spendable amount. Spendable amount is based on the maximum purchase limit over a given period and denotes what can be used by the CH
“Available amount in card account” that is over and above the “Max purchase limit over time “ cannot be used by the CH i.e is not spendable. Hence the top up amount cannot be more than the difference between the “Max purchase limit over time” and the “Spendable amount”
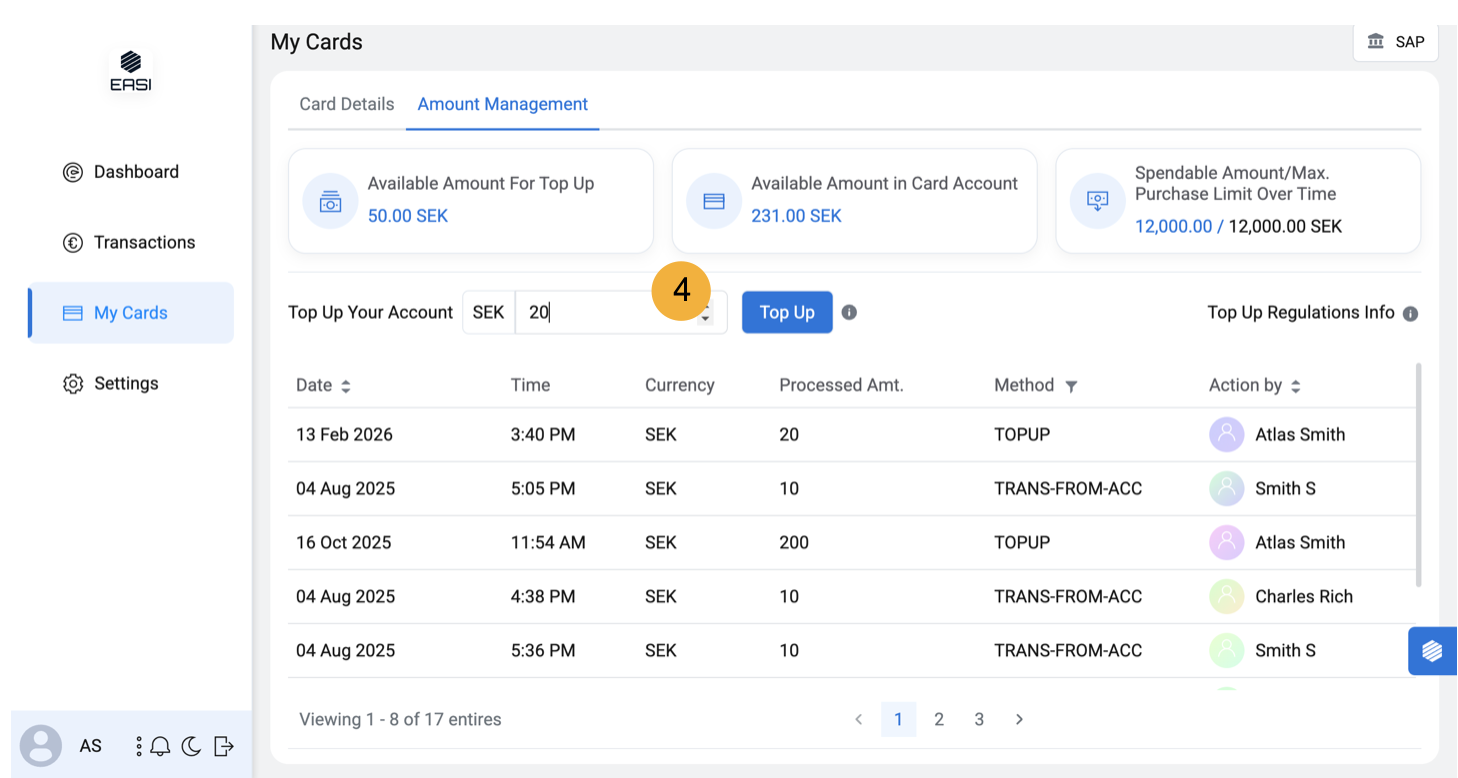
Understanding Topping up your account
4. When the top up amount is satisfying all the above explained parameters and limits the top up CTA button will be enabled and the amount can be topped up. A toast message on top will denote that the action is successful. The portal will not allow for top up amount that are beyond the “max. purchase limit over time” or that which exceed total amount available. The Top up CTA button will be disabled and error message can be viewed.