Introduction
1. Completing the KYC process:
Upon receiving the KYC link via email, the cardholder must complete the KYC tasks.
2. Activating their card:
After successful verification of the KYC process, the issued card must be activated to enable transactions.
3. Submitting transaction details:
For every successful transaction, the cardholder must submit the transaction details, which are categorized under ‘Review transactions’. In some cases, they may need to resubmit transaction details if discrepancies are found.
2.Home (Spend graph, Quick links, Chatbot)
3.Notifications
4.Transactions (List, Features, Details Submit / View)
5.Profile
6.Rules
7.My Card ( Activate, View details, Block)
8.Login
<span data-metadata=""><span data-buffer="">PIN Registration
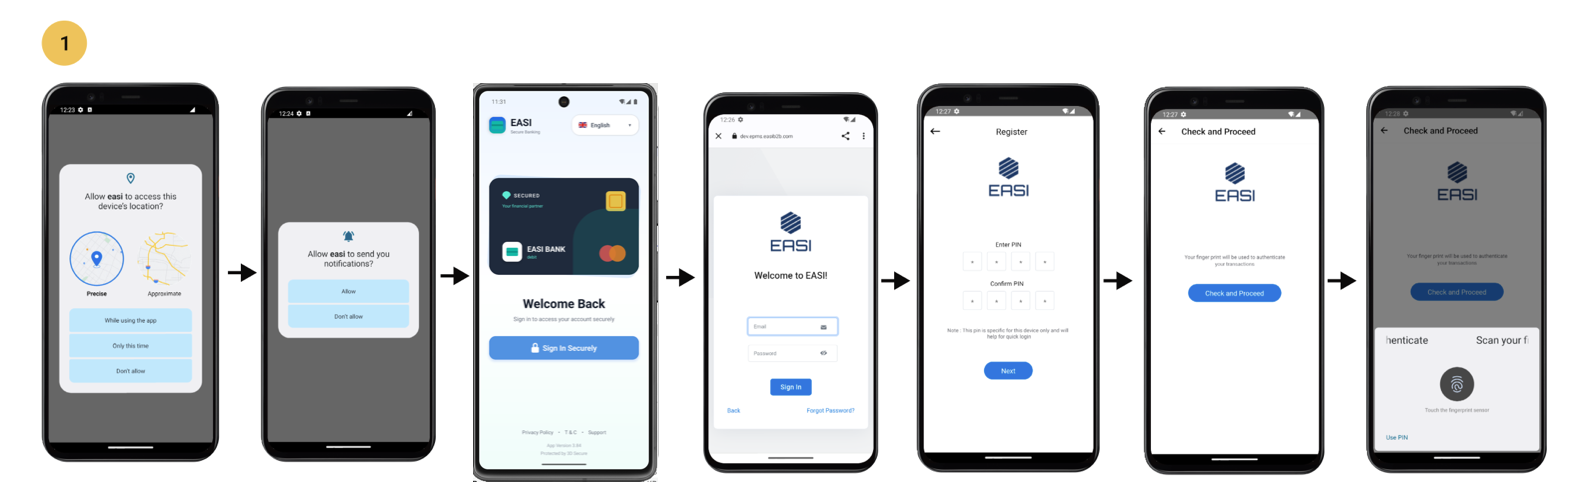
<span data-metadata=""><span data-buffer="">Registration, Sign In <span data-metadata="">
i. After installing the app, the cardholder needs to open it.
ii. The cardholder will receive prompts to enable location services and notifications, both of which are mandatory.
iii. On the registration “Sign In” screen, the cardholder must enter their credentials to proceed with PIN creation.
iv. The cardholder then accesses the PIN creation screen and creates a PIN.
v. Once the PIN is created, the cardholder can proceed to the final step of signing in using their PIN or fingerprint authentication.
Note: After completing this process, the cardholder can use their PIN or fingerprint authentication for future sign-in and access to card details.
<span data-metadata=""><span data-buffer="">SIGN IN<span data-metadata="">
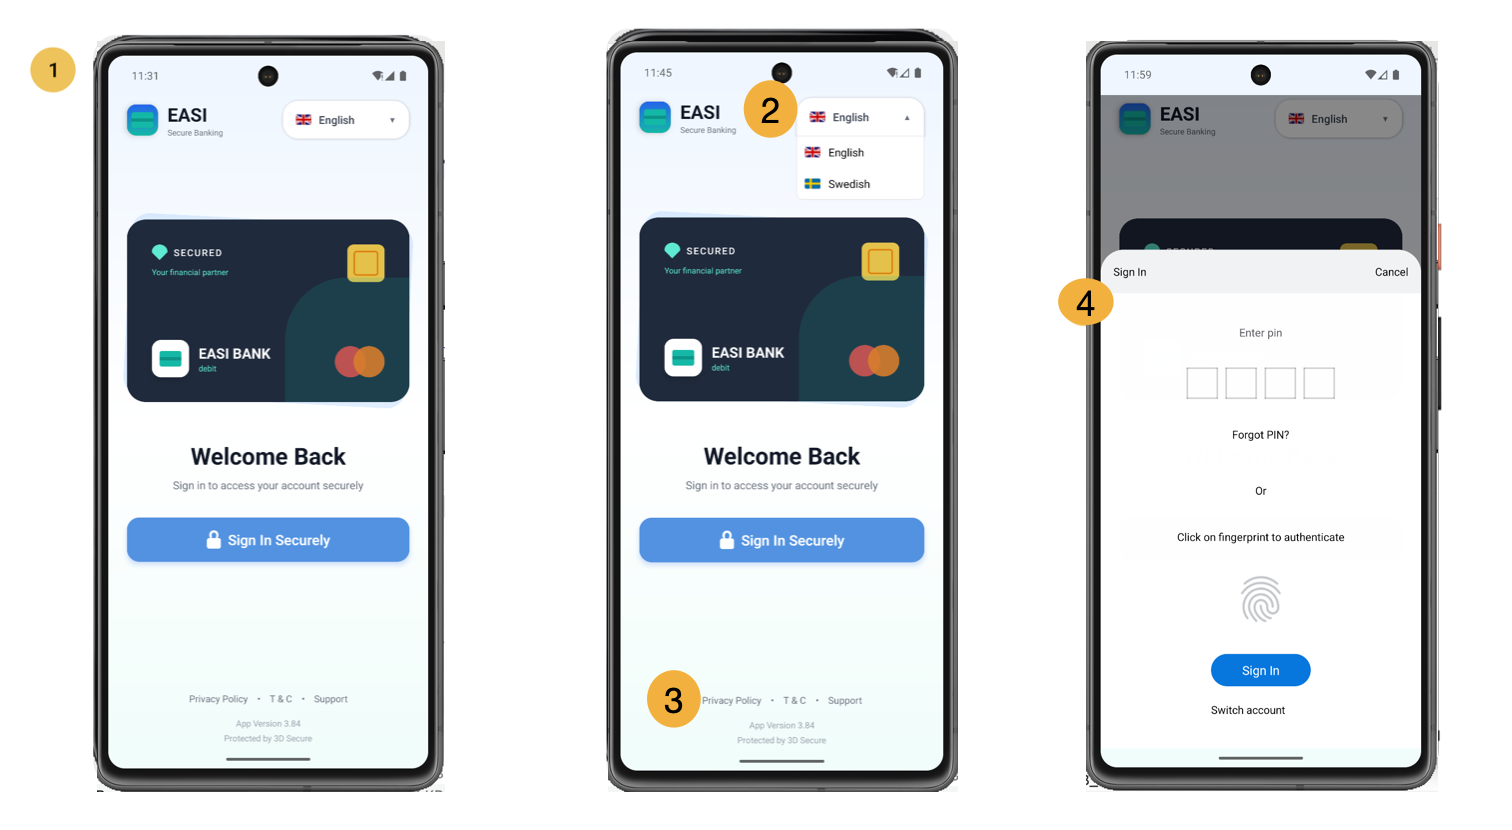
<span data-metadata=""><span data-buffer="">1.Sign In
The sign-in screen enables the cardholder to provides a secure access point to the application after the registration process.
<span data-metadata=""><span data-buffer="">2.Language
Cardholder can change the language setting for the portal using the feature available on the sign-in page.
<span data-metadata=""><span data-buffer="">3. Information Resource Links<span data-metadata="">
Cardholder can access information related to:
Privacy Policy
Terms and Conditions (T&C)
Support
3D Secure FAQs
by clicking on these links. They will be redirected to the relevant pages.
<span data-metadata=""><span data-buffer="">4.Sign In <span data-metadata="">
The cardholder can use their PIN or fingerprint authentication for sign-in and access to card details.
<span data-metadata=""><span data-buffer="">Home, Notifications<span data-metadata="">
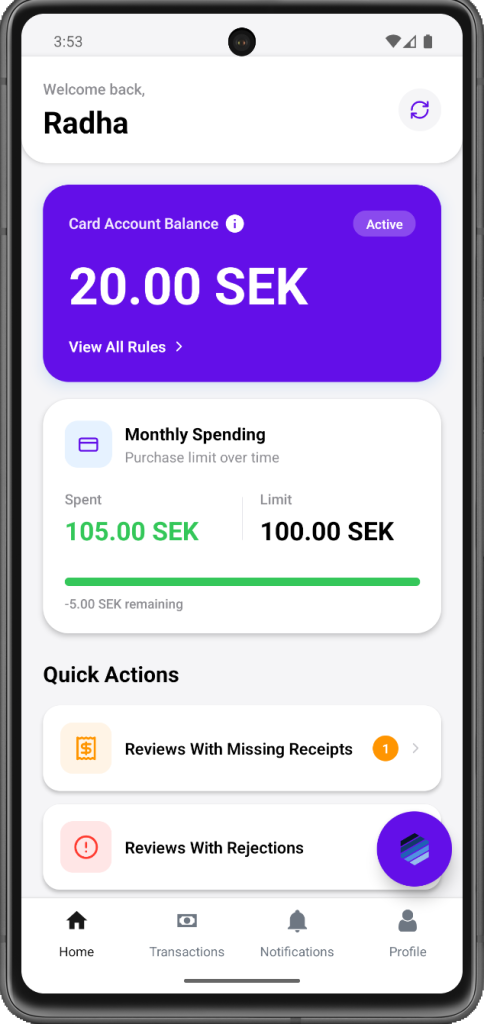
<span data-metadata=""><span data-buffer="">1.Home
Default landing screen of the application.
Cardholder can view their spend graph related to amounts allotted to them, view rules , access transaction details which are of priority in terms of task
<span data-metadata=""><span data-buffer="">2.Spend Graph
To view the status of the amount in terms of spent and remaining spend limit related to maximum purchase limit over time.
<span data-metadata=""><span data-buffer="">3.Quick Links<span data-metadata="">
The quick links will allow user to easily access the required transaction details which are important to them. It also helps user to know how many Review and Review ( R) are there which are important for submission or resubmission.
<span data-metadata=""><span data-buffer="">4.EASI Guide Chatbot<span data-metadata="">
Assists users in understanding features, navigating through processes, and providing help and support.
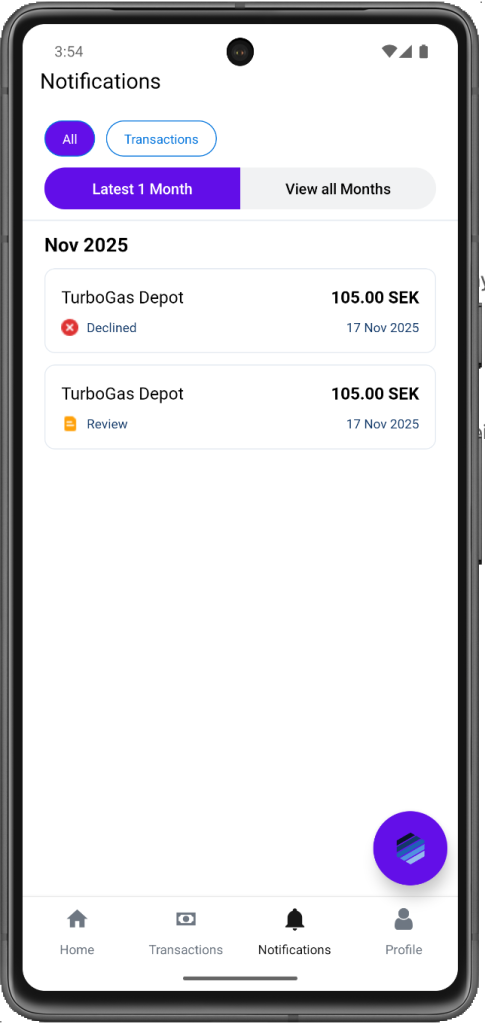
<span data-metadata=""><span data-buffer="">5.Notifications<span data-metadata="">
“>To view all types of notifications or only those which are related to transactions. They can view the content which are latest 1 month or all months.
For “Transactions” notifications , only transaction related updates will be shared.
For “All” notifications , the important updates will also be notified along with transactions.
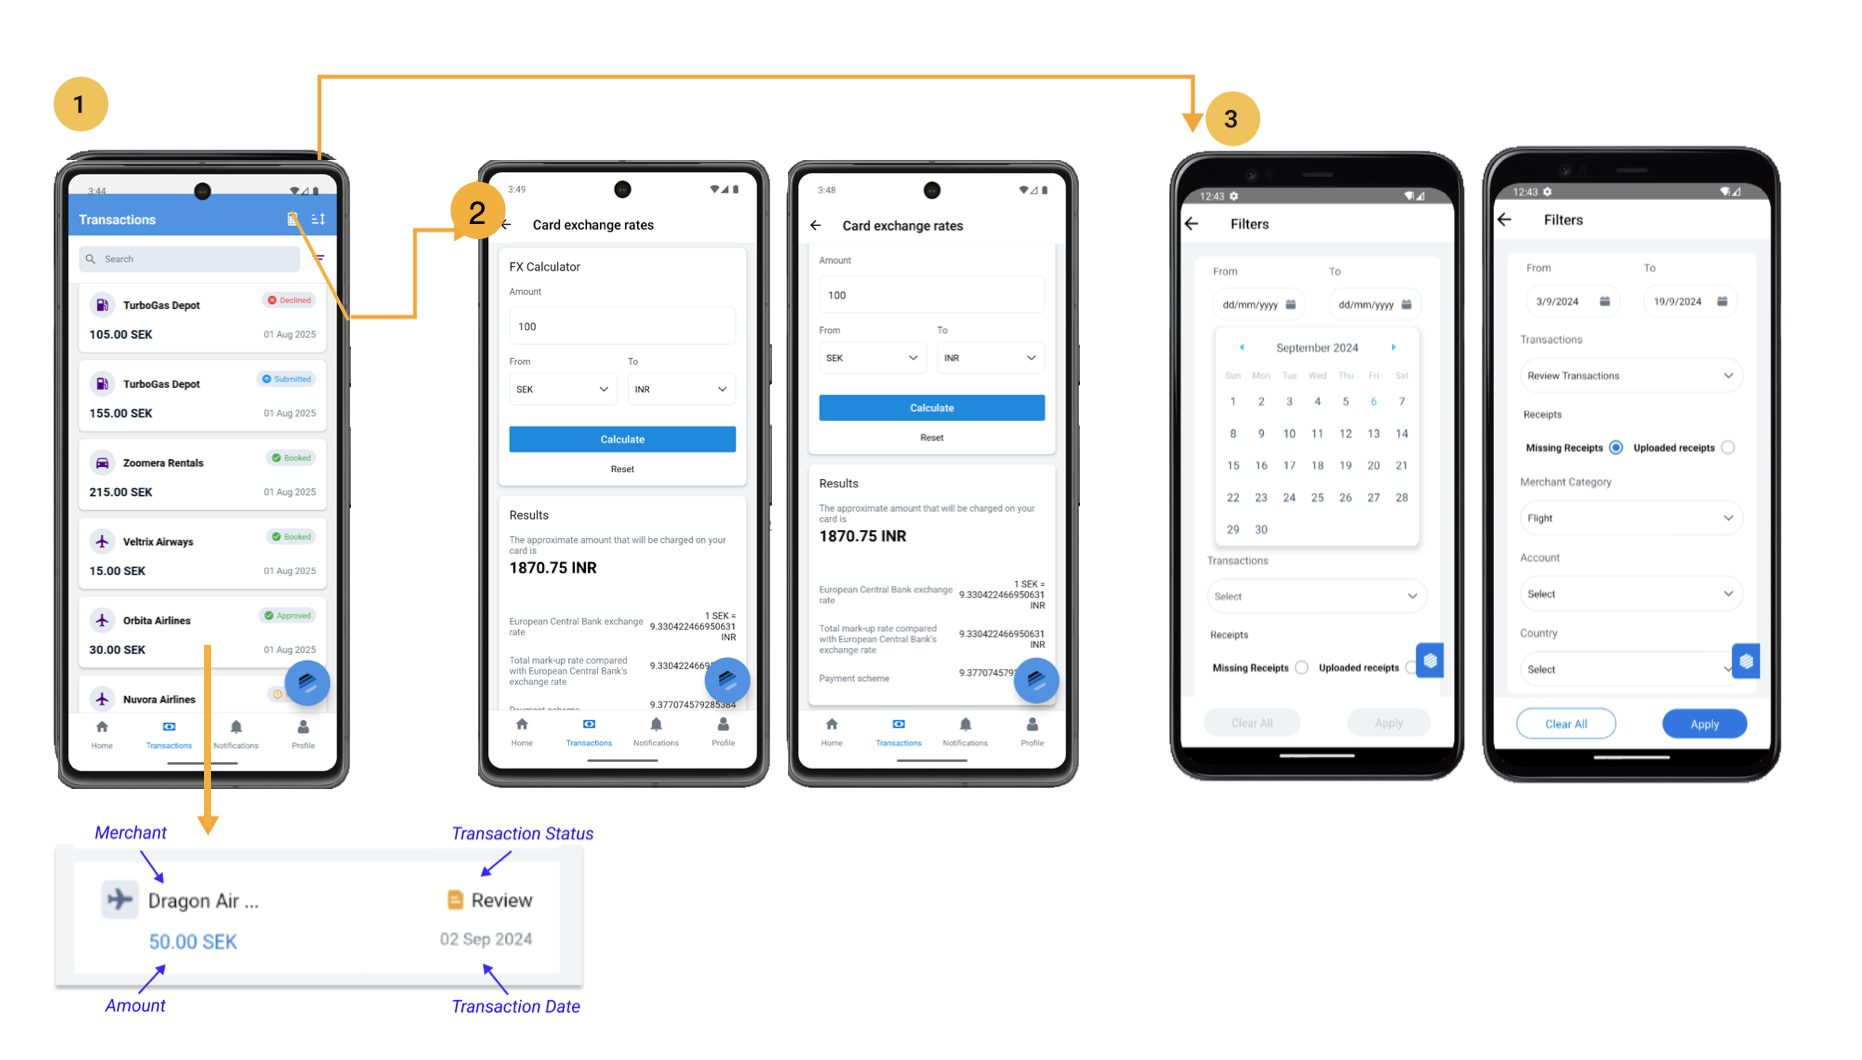
1.Transactions contains the list of all the transactions conducted by cardholders. the information is represented in format of cards. Clicking on these cards, cardholders will be redirected to the pages with all the details related to the transaction. Cardholders can search for the required transaction using the search feature and the list of transactions can be filtered and sorted as per need.
<span data-metadata=""><span data-buffer="">2.Card Exchange Rate Calculator<span data-metadata="">
Cardholder can use this feature to get the amount conversion details between different currencies.
Steps to follow:
i.Enter the amount you want to convert.
ii.Select the currencies for conversion.
iii.Click the “Calculate” button to view the conversion details.
<span data-metadata=""><span data-buffer="">3. Transaction list filter
Cardholders can use the filter option to narrow down the transaction list based on various parameters. By clicking on the filter icon, they are taken to a separate page where they can select the desired criteria and apply the filter to view the filtered transaction list.
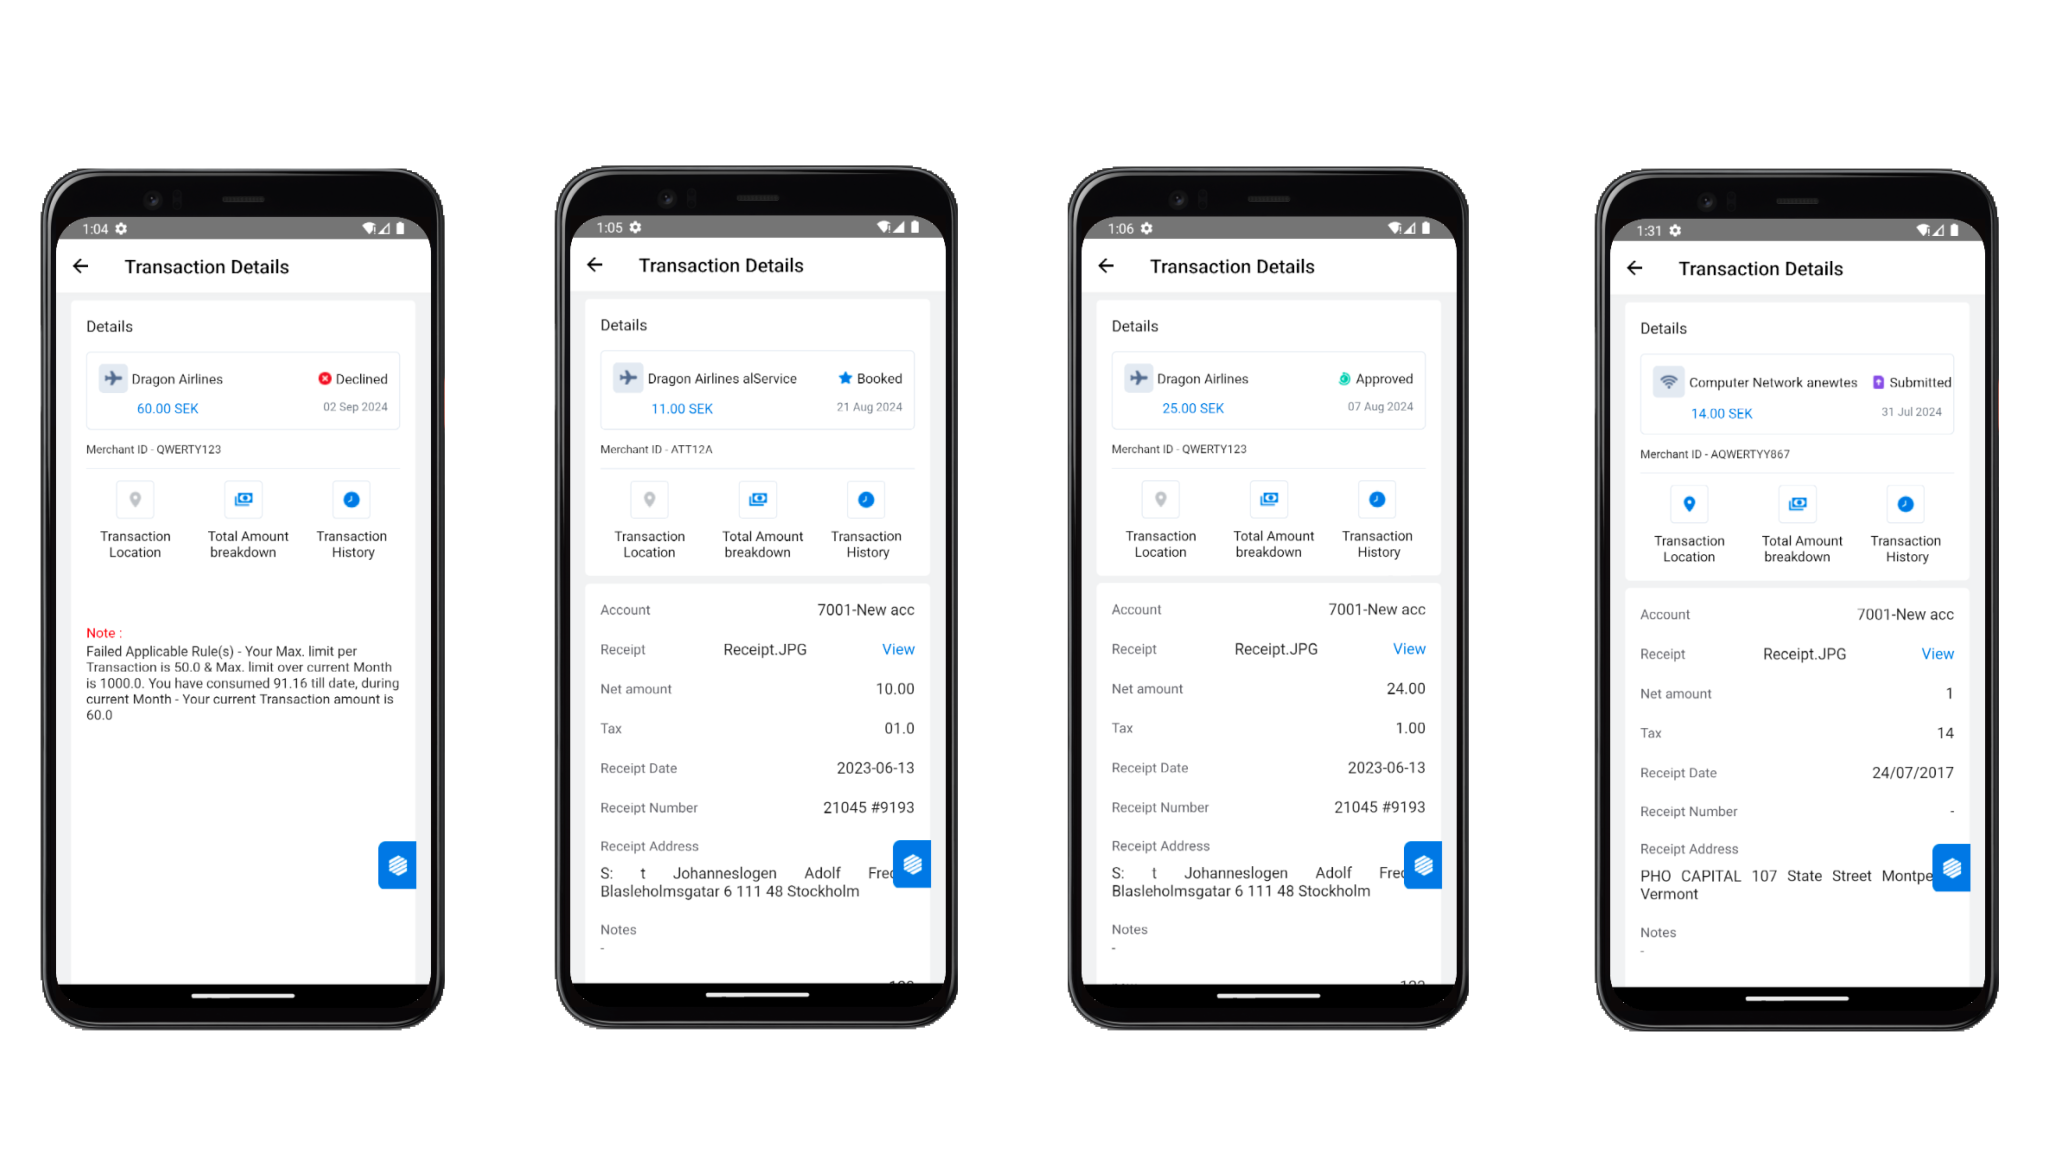
<span data-metadata=""><span data-buffer="">1.Transaction Details<span data-metadata="">
Cardholders can view a transaction’s details by clicking on the transaction display card in the transactions list.
Transaction details consist of two distinct sets of information:
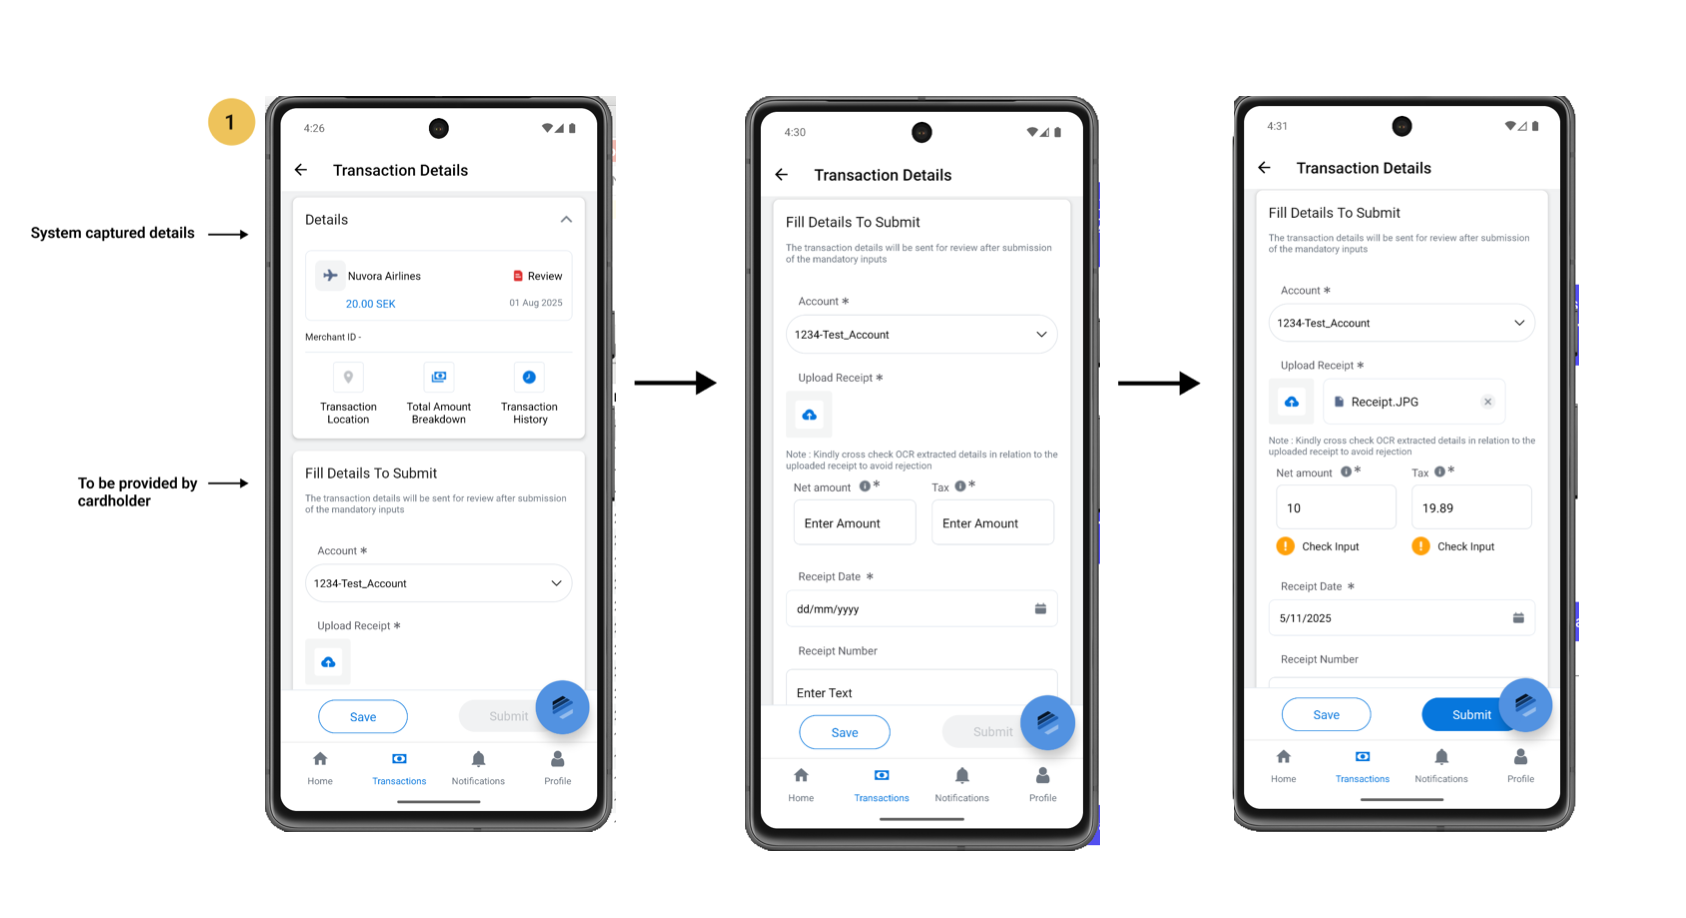
i.System Captured Details: These are the transaction-related details automatically captured by the system, as shown in the image.
ii.Cardholder-Provided Details: These are the details that the cardholder must manually input, as shown in the image.
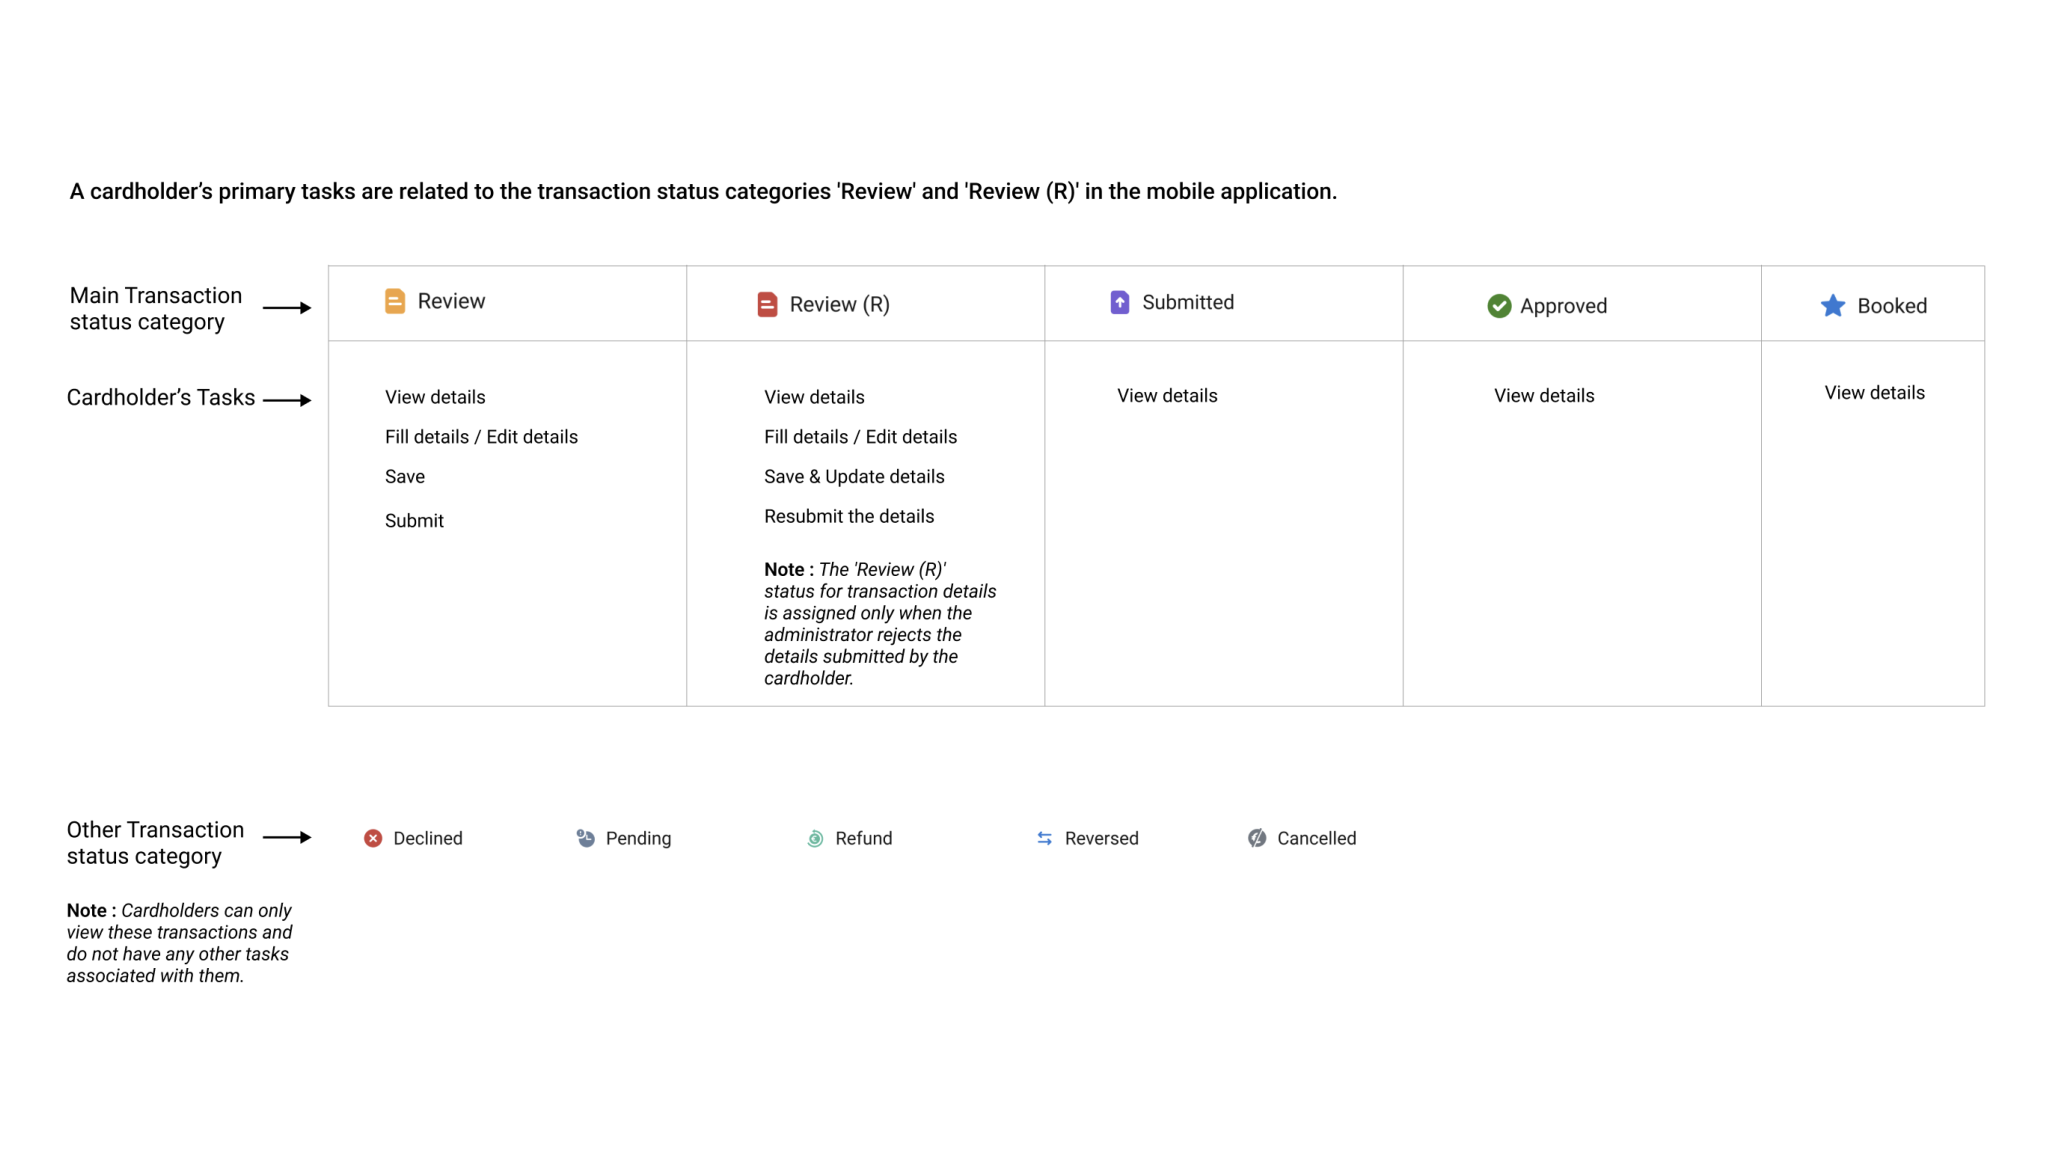
The transaction details of transactions categorized under ‘Review’ and ‘Review (R)’ are crucial for submission and require review by the admin.
In these statuses, when a cardholder uploads a receipt, Optical Character Recognition (OCR) automatically populates the input fields, such as Net Amount and Tax Amount, for ease of submission.
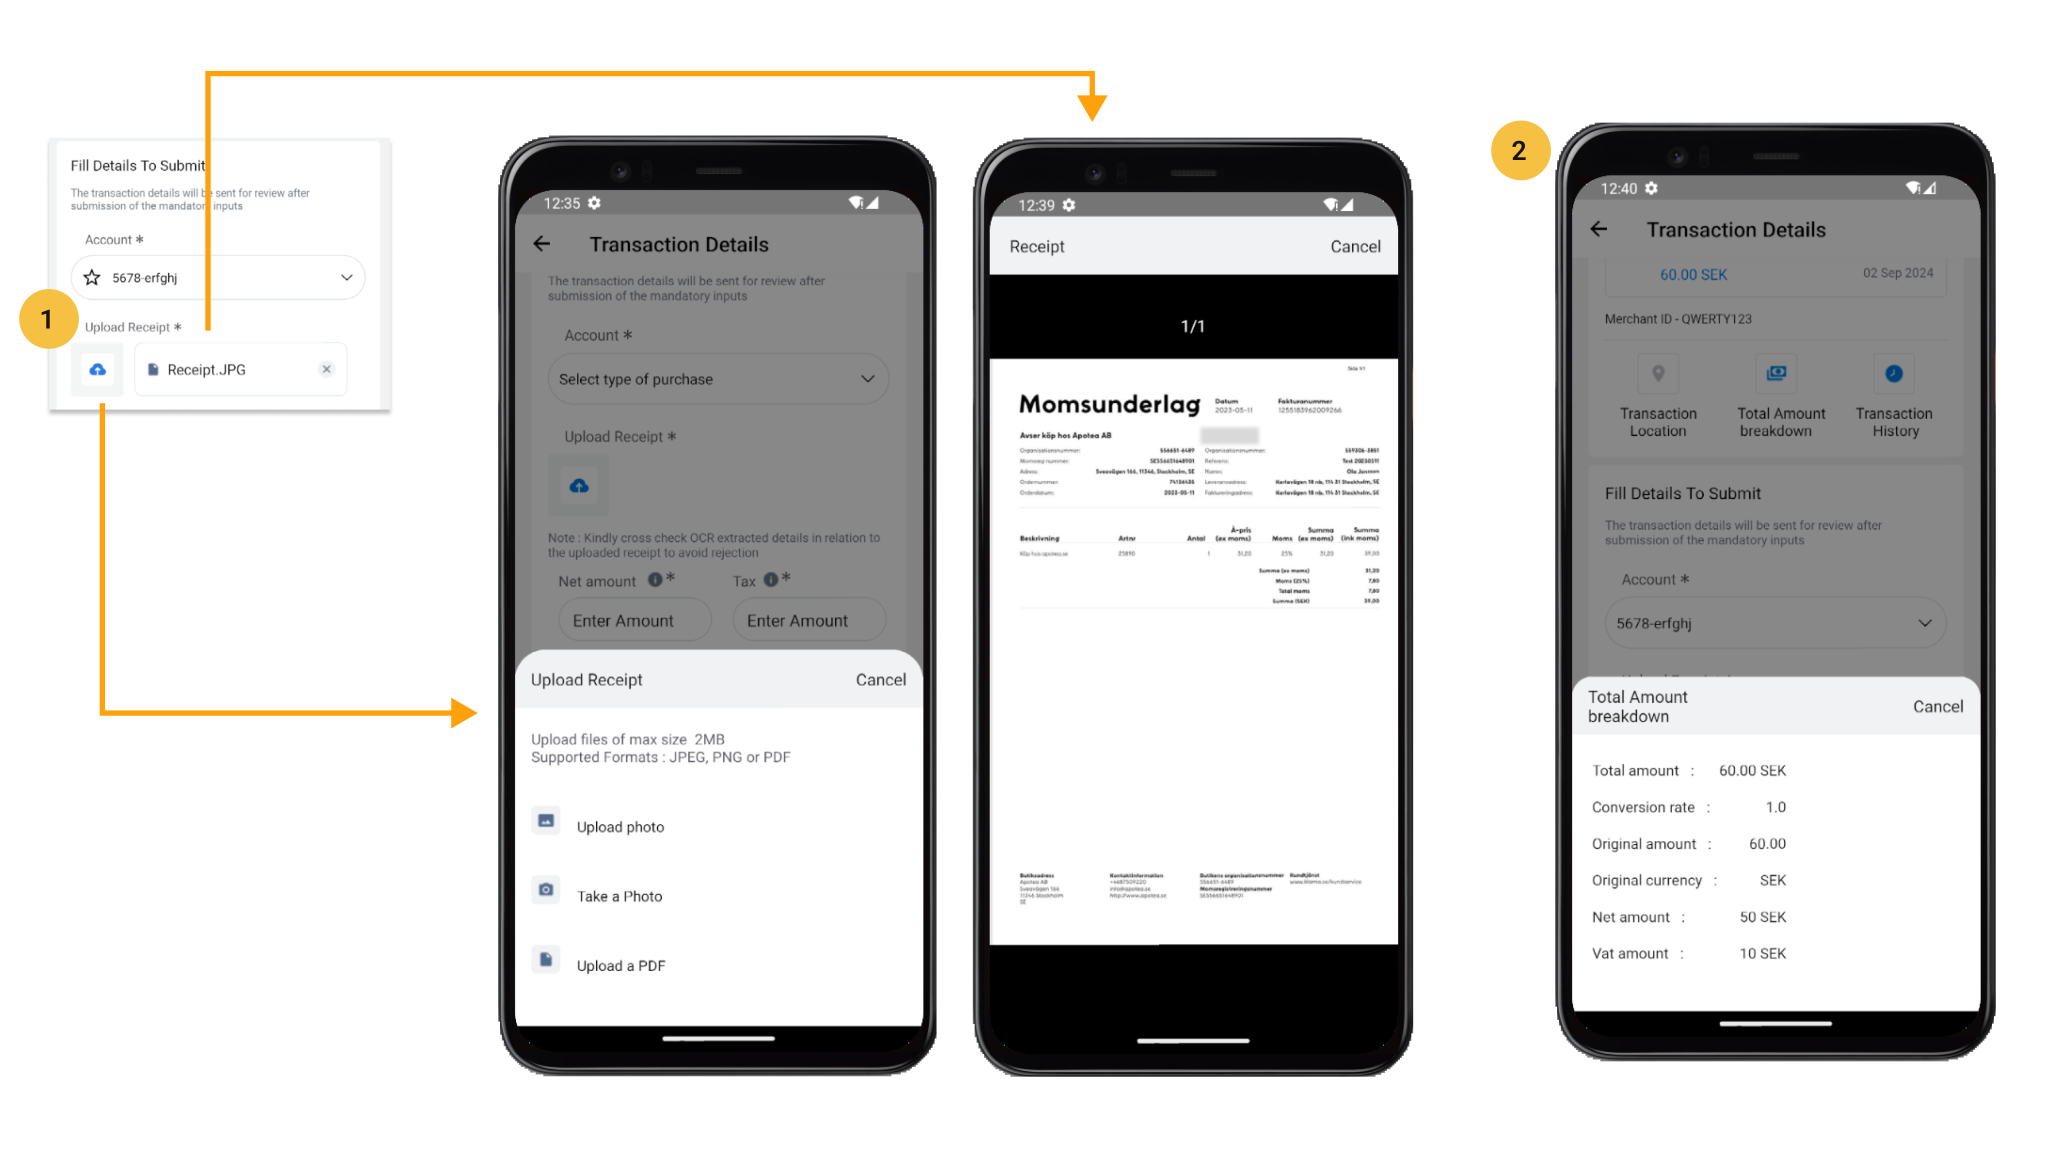
<span data-metadata=""><span data-buffer="">1.Upload Receipt<span data-metadata="">
Cardholders can upload transaction-related receipts that include the net amount and tax. These details will be extracted using OCR. To view the uploaded receipt, the cardholder must save it first.
<span data-metadata=""><span data-buffer="">2.Total Amount Breakdown<span data-metadata="">
To view key amount-related details, including: Conversion rate,Tax, Net amount and Total amount
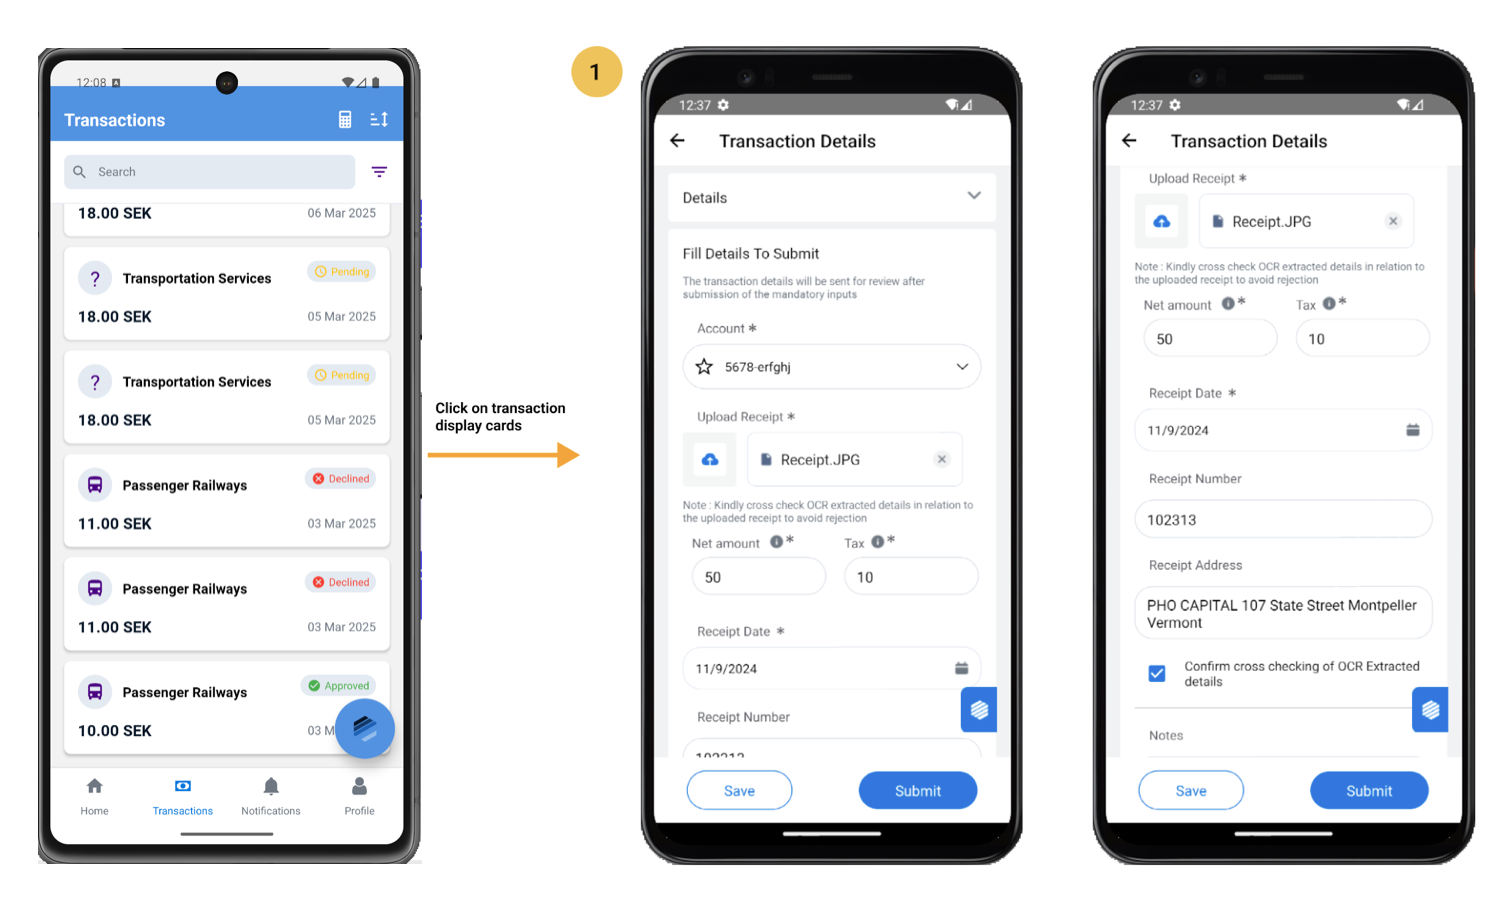
<span data-metadata=""><span data-buffer="">1.Submitting Transaction Details<span data-metadata="">
A cardholder’s primary task is to submit transaction details categorized under ‘Review’ or ‘Review (R)’
Steps to follow:
i.Sign in to the app.
ii.On the ‘Home’ page, view the quick links that display the important transaction status viz. ‘Review’ and ‘Review (R)’.
iii.Click on the required transaction status quick link to view the filtered list of transactions.
iv.Browse through the list of Review / Review (R) and click on the transaction display card to access the transaction details page.
v.On the transaction details page, view information such as:
* Transaction location
* Total amount breakdown
* Transaction-related details captured by the system
vi. Based on the requirements, correct any incorrect details or fill new information along with the transaction receipt.
vii. Review the details carefully and click on the “Submit” button to complete the process.
Note: Cardholder can also choose to “Save” the details for submission later.
Other than Review, Review (R) those that are rejected. All other transaction status details are read-only.
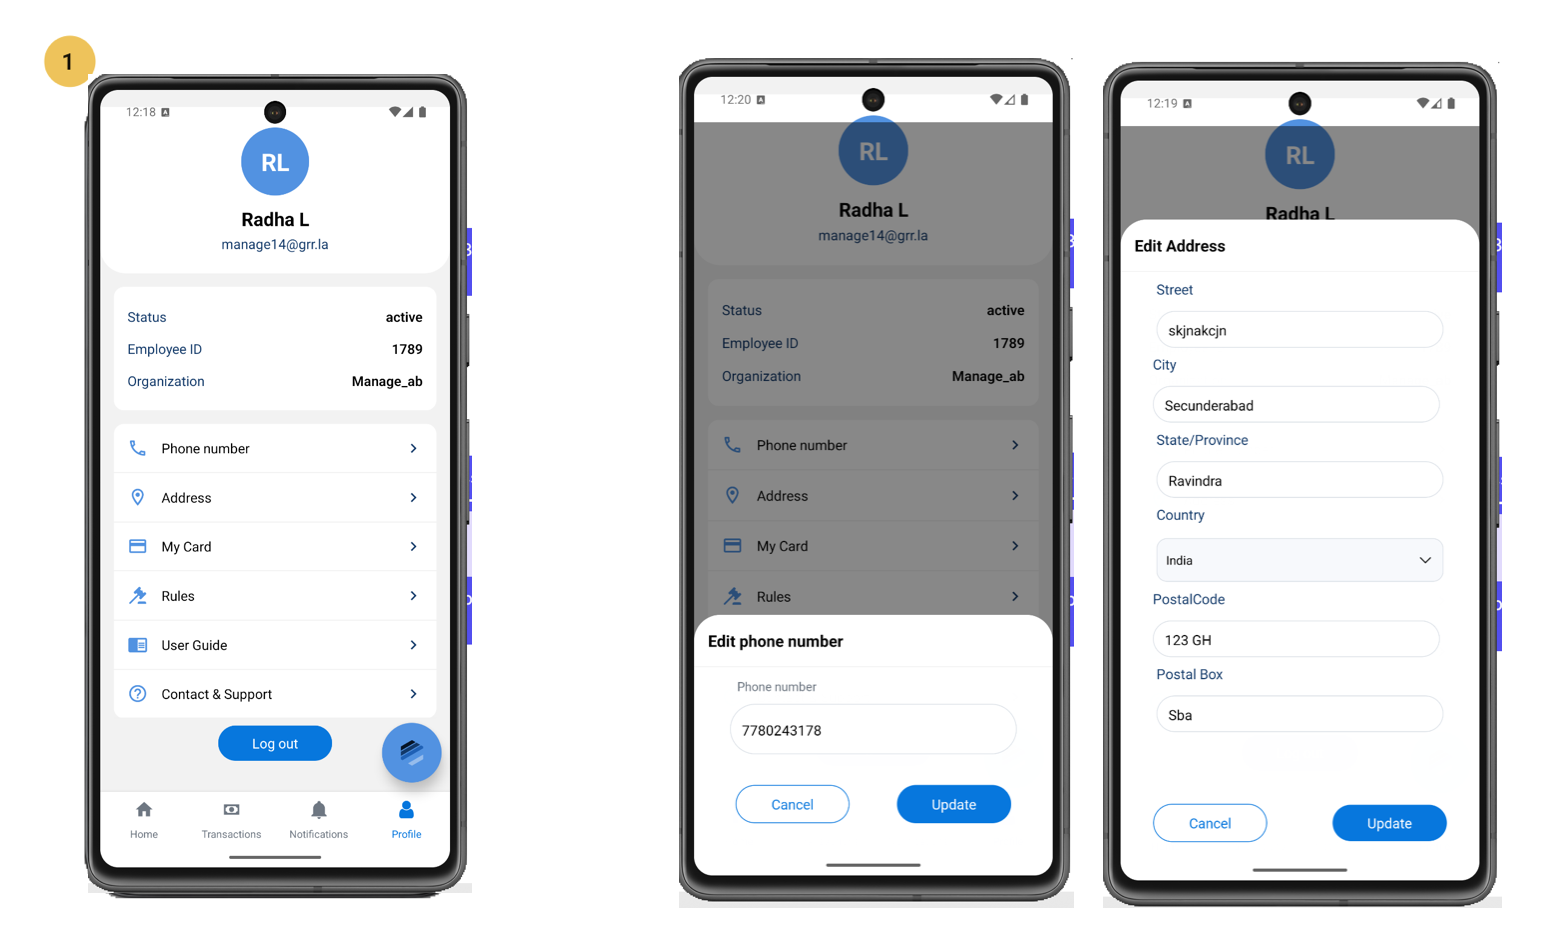
1.The Cardholder Profile section provides a comprehensive overview of the cardholder’s details, including their organization, card information, and expense card rules. Additionally, they have direct access to contact and support resources.
Within their profile, cardholders can view and edit two essential pieces of information: their phone number and address.
2. Editing Phone Number and Address
To update phone number or address, cardholder should follow the steps below
i.Click on the “Edit” option provided next to either your phone number or address.
ii.Upon clicking “Edit”, the editable sections will be displayed.
iii.Make the necessary changes to phone number or address.
iv.Click on the “Update” button to complete the editing process.
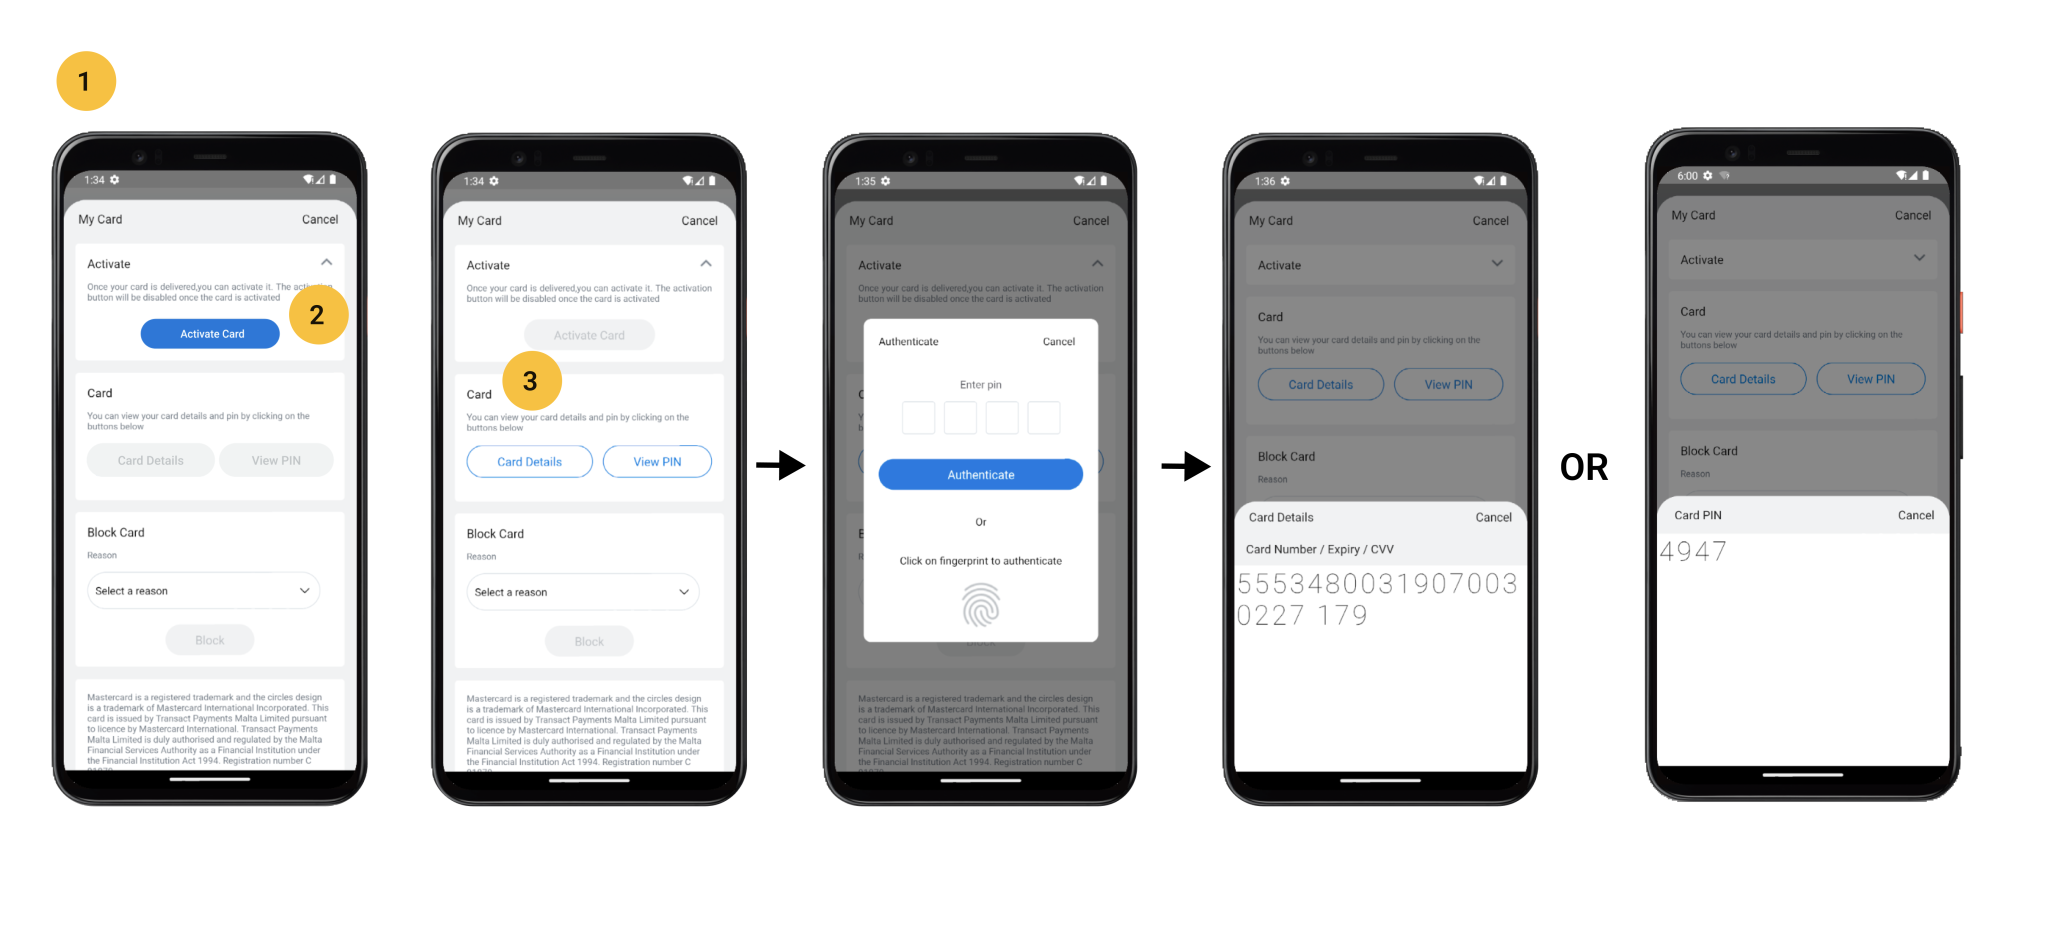
1. My Card
Cardholders can access this page from their “Profile.” On this page, they can activate their card, view card details and PIN, and have the option to block the card if necessary.
2. Activate Card
After successful Know Your Customer (KYC) verification, cards will be issued to the cardholder. To start using the card for transactions, the cardholder must activate it within the application.
<span data-metadata=""><span data-buffer="">3. Card Details and PIN <span data-metadata="">
Cardholders can access their card details and PIN by clicking on the respective buttons and verifying their identity using fingerprint authentication.
The option to view card details and PIN is only available for activated cards.
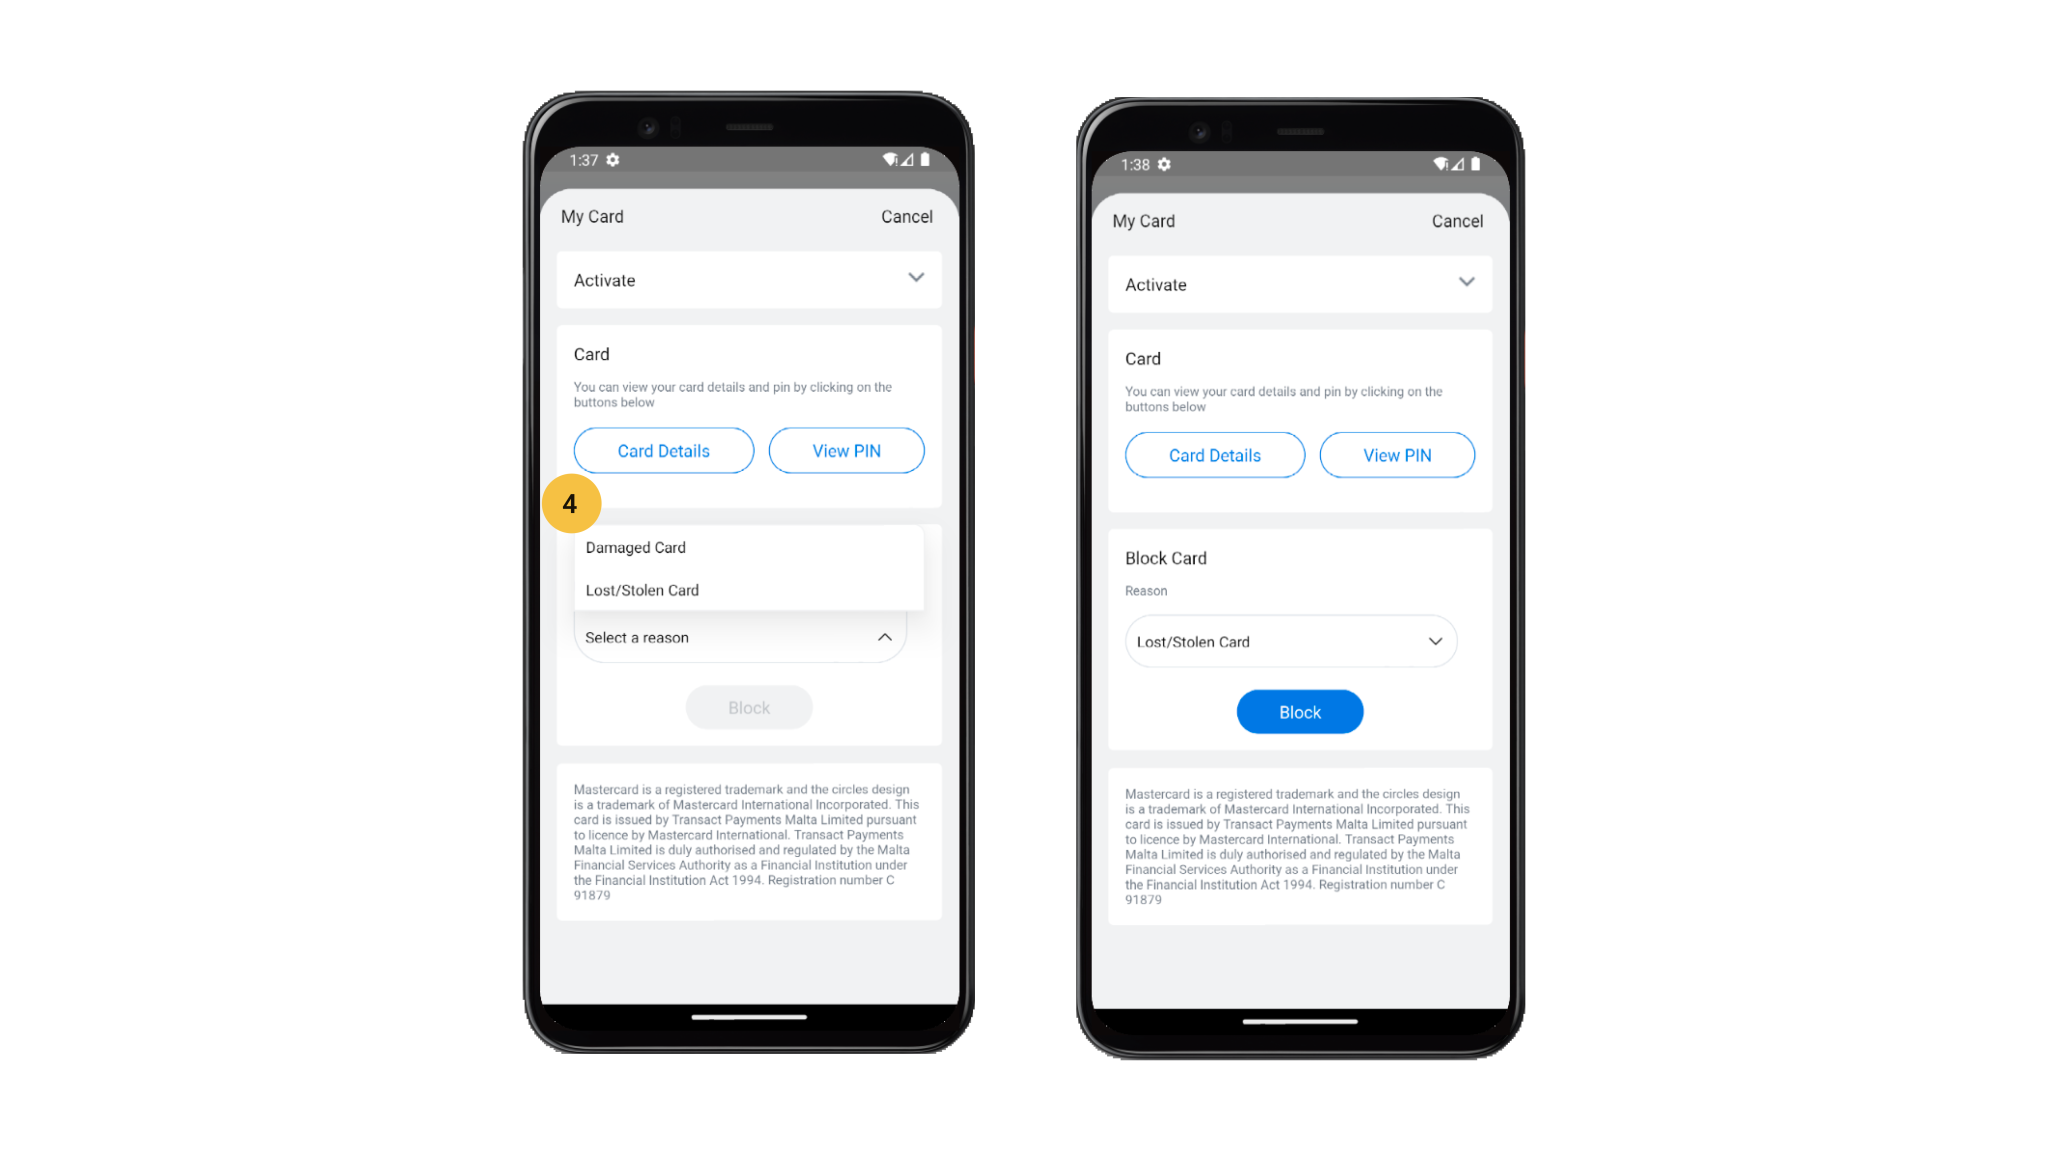
1. Block Card
The Block Card feature, located in the My Card section, allows cardholders to block their card if it is lost, damaged, or for other reasons.
Steps to Follow:
i.Open the app.
ii.Go to “Profile.”
iii.Within the Profile section, select “My Card” to access the card blocking feature.
iv.Under “Block Card,” provide a reason for blocking the card.
v.Click “Block” to complete the process.
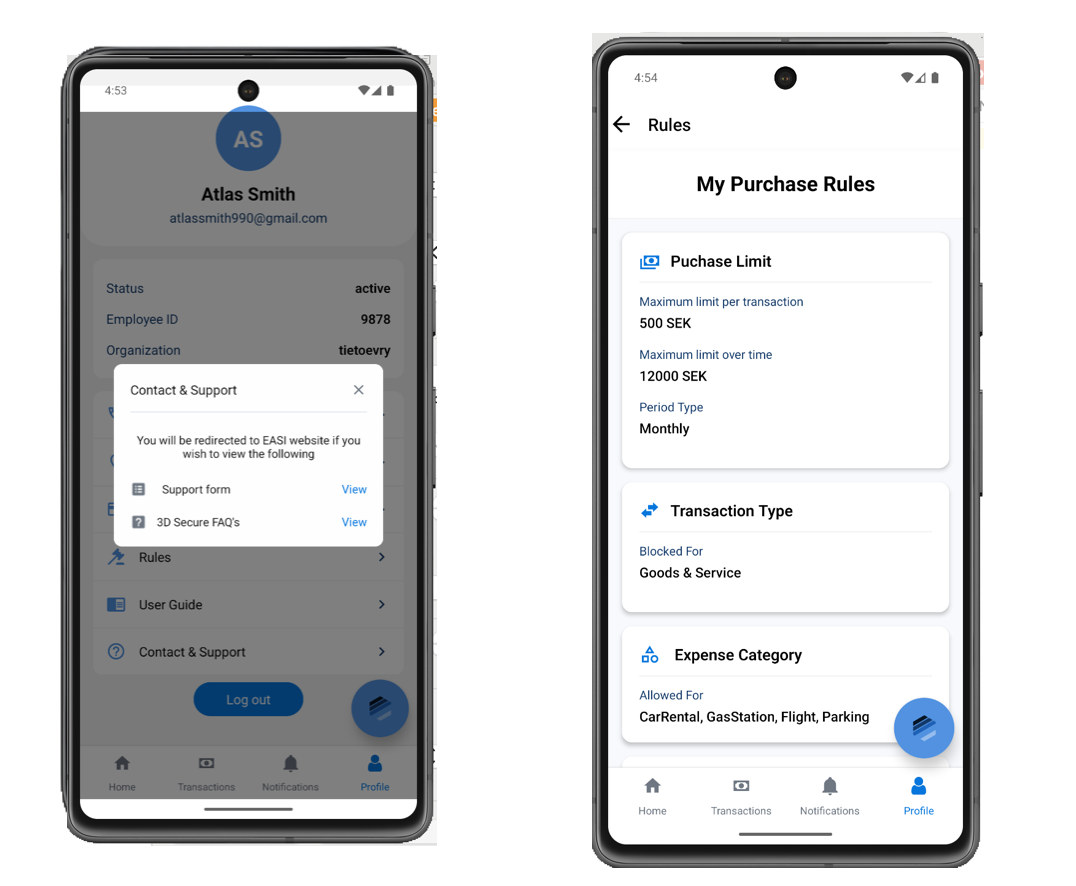
1. Contact & Support
To access Support and 3D Secure FAQs pages, cardholders can click on the given links and it will redirect them to the relevant pages.
2. Rules
“>The cardholder can view all the rules governing their expenses on this page. This helps them understand the permissible and non-permissible scenarios, enabling them to make well-managed transactions.